ubuntu 的日常使用中遇到的问题与解决
记录 ubuntu 使用过程中的零碎问题
thunderbird 锚标 的创建和使用
This indicates a place that you can link to. You can use this for example to create an index at the start of the mail. When you select the text around it and go to menu Insert > HTML, you can see the HTML code generated for the anchor. It should be something like test.
You can insert anchors yourself with menu Insert > Named Anchor and you can link to it by adding a link with Insert > Link and refer to the name “#test” for the example above.
In the generated message there will be a link and if the recipient clicks the link, focus will move to the place where the anchor is.
This only works for HTML messages and it works very much the same as links on a HTML-page.
If you don’t “point” to the anchor, nothing bad happens. The recipient doesn’t see it, it just makes your message a bit bigger, which happens anyway when you copy text from Word. The only way to prevent that is to paste without formatting, e.g. by pressing Ctrl+Shift+V.
总之 就是 引用 时不要忘了加 “#”
U盘格式支持
https://askubuntu.com/questions/1403900/how-to-install-exfat-utils-and-hddtemp-on-ubuntu-22-04
exfat-utils has been replaced by exfatprogs (tools to create, check and label exFAT filesystems) in Ubuntu 22.04 and later. To install exfatprogs in Ubuntu 22.04 and later run the following command:
1 | sudo apt install exfatprogs |
The tools included in this package are the exfatprogs maintained by Samsung engineers, who provided Linux exFAT support. A similar but independent implementation of these tools, written by the author of the exfat-fuse implementation, is available in the exfat-utils package.
Read and write support for the exFAT filesystem is implemented in the Linux kernel in versions 5.7 and later.
总之,就是下载 exfatprogs 可以支持exFAT格式的u盘格式化,Linux 内核 版本> 5.7 就可以读取 exFAT 格式 u盘
cuda 和 cudann 的安装
ubuntu 软件和更新中安装最新的显卡驱动
然后在终端输入
nvidia-smi如果显示1
2
3
4
5
6
7
8
9
10
11
12
13
14
15
16
17
18
19
20+---------------------------------------------------------------------------------------+
| NVIDIA-SMI 530.30.02 Driver Version: 530.30.02 CUDA Version: 12.1 |
|-----------------------------------------+----------------------+----------------------+
| GPU Name Persistence-M| Bus-Id Disp.A | Volatile Uncorr. ECC |
| Fan Temp Perf Pwr:Usage/Cap| Memory-Usage | GPU-Util Compute M. |
| | | MIG M. |
|=========================================+======================+======================|
| 0 NVIDIA GeForce GTX 1650 Ti On | 00000000:01:00.0 Off | N/A |
| N/A 53C P8 3W / 50W| 6MiB / 4096MiB | 0% Default |
| | | N/A |
+-----------------------------------------+----------------------+----------------------+
+---------------------------------------------------------------------------------------+
| Processes: |
| GPU GI CI PID Type Process name GPU Memory |
| ID ID Usage |
|=======================================================================================|
| 0 N/A N/A 2560 G /usr/lib/xorg/Xorg 4MiB |
+---------------------------------------------------------------------------------------+- 去官网按照 指示下载 toolkit。。。里面包含 cuda 和 cudnn 等
github 文件夹有白色箭头无法打开
- 删除子文件夹里面的.git文件
- 执行
git rm --cached [文件夹名] - 重新 push 即可
ubuntu 22.04 窗口毛玻璃特效
blur-my-shell 插件设置即可
ubuntu 22.04 qq 音乐闪退
/usr/share/applications/qqmusic.desktop 加上 –no-sandbox 即可
1 | [Desktop Entry] |
他
记录 找不到 的问题
clang++ 编译 cpp 无法找到 iostream 且 clangd 无法正常工作
其实原因很简单 系统里只有 gcc-12 但是没有 g++-12 clang++找最新版的gcc 也就是gcc-12 却没有相应的 g++-12 标准库
只要安装 g++-12 就行了
但是我直接卸载了 g++-12(甚至使用了 sudo apt autoremove), 我本以为这样 clang++就会用低版本 gcc-11 和 g++-11(这两个在我系统上都有)
事实也的确如此
但是卸载 g++-12 会导致把 cuda 以及对应的显卡驱动全部卸载… 于是,我重新安装 cuda
1 | wget https://developer.download.nvidia.com/compute/cuda/repos/ubuntu2204/x86_64/cuda-keyring_1.0-1_all.deb |
1 | 下列【新】软件包将被安装: |
可以看到 安装cuda 的过程会安装 g++ gcc gcc-12 但是没有 g++-12 因此会导致 clang++ 和 clangd 自动使用高版本 gcc-12 而无法使用对应的 libstdc++ 解决办法也很简单 sudo apt install g++-12 即可
批量更改文件名
1 | IFS=$'\n' |
因为名字中有空格 先设置 分隔符为 回车 然后 遍历所有 mp4 文件 删除 名字里的部分内容 ~~~
vscode typora 插件
typora
ubuntu 22.04 网易云打不开
1 | $ cd /opt/netease/netease-cloud-music |
1 | #!/bin/sh |
gnome 终端 更改复制粘贴键
改后 中断键变为 ctrl+alt+c
开启wayland
1 | sudo vim /etc/gdm3/custom.conf |
1 | WaylandEnable=true |
1 | sudo systemctl restart gdm3 |
但是还是有些小bug 所以先不用
安装AppImage 文件
如果要安装 your.AppImage
- 把文件放在你想要的路径 YOUR_DIR
- 把app logo 例如 your.svg 放在你想要的路径下 YOUR_LOGO_DIR
vim .local/share/applications/your.desktopdesktop [Desktop Entry] Name= Version=1.0 Type=Application Exec= Icon= Terminal=false StartupNotify=trueExec 是 YOUR_DIR/your.AppImage
Icon 是 YOUR_LOGO_DIR/your.svg
赋予文件可执行权限 右键->属性 也可以设置文件为可执行
chmod 755 your.desktop于是你就可以在程序里找到这个软件了
保存网页的html logo
点击选择工具 再点击 图标

找到 svg标签
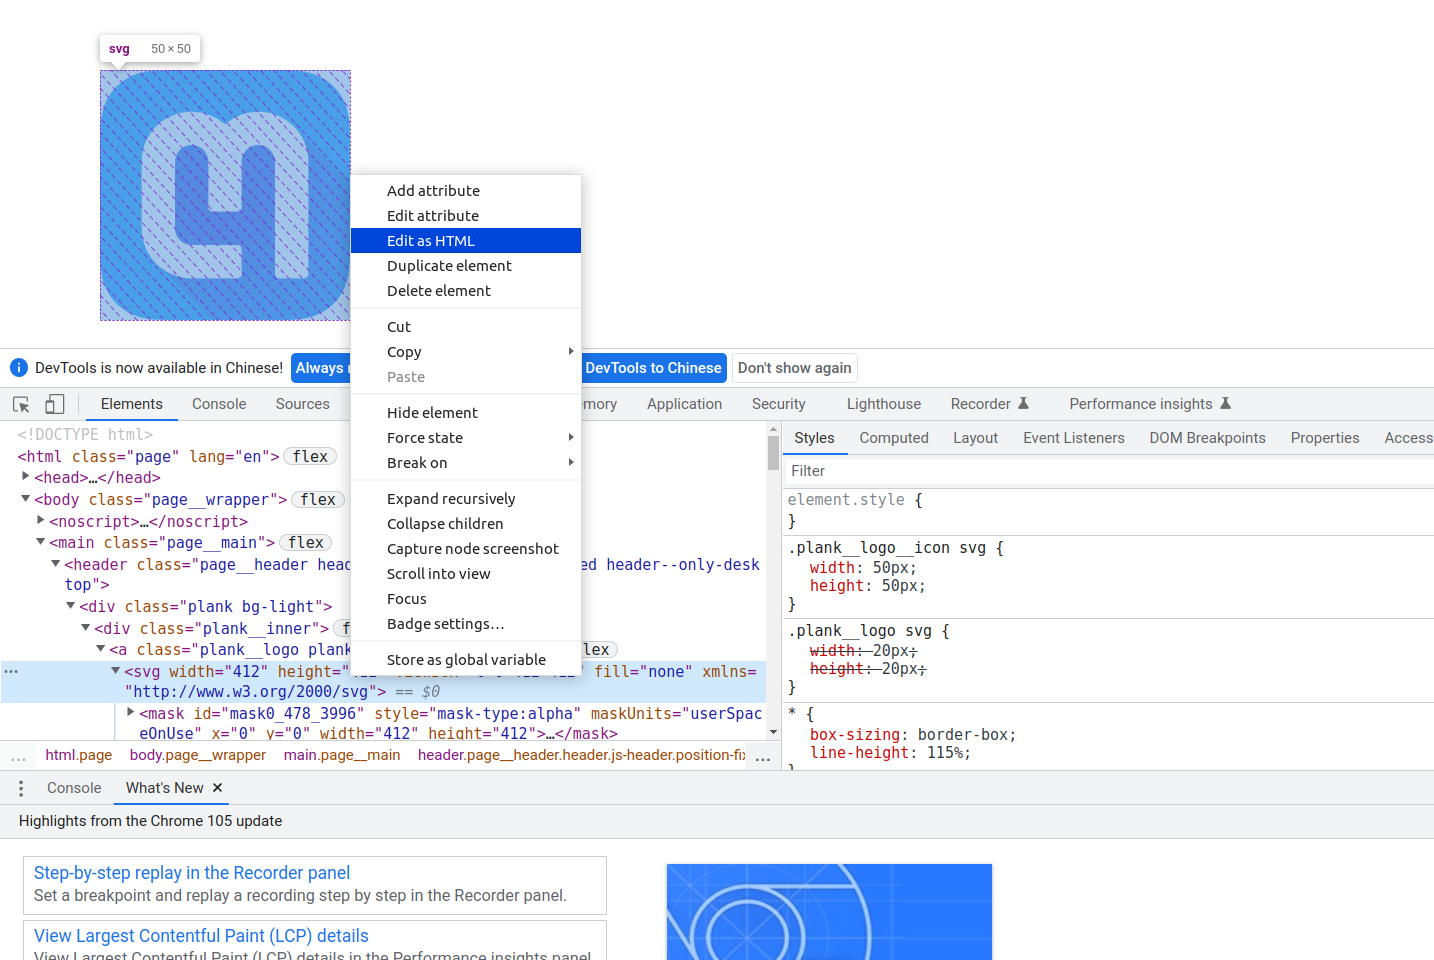
右键 html 编辑
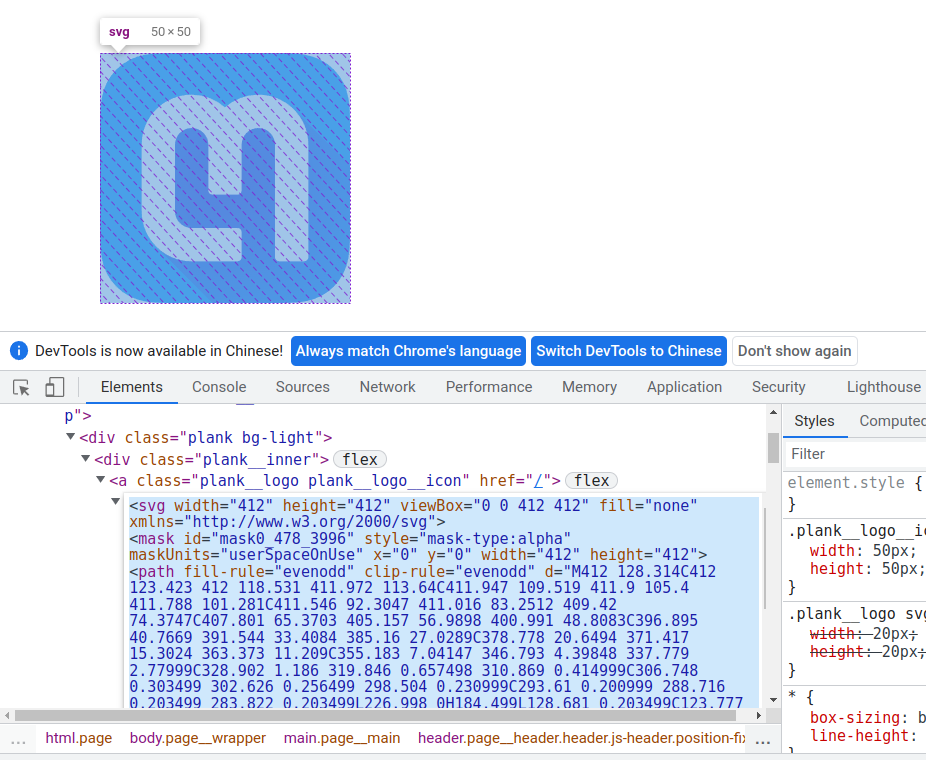
复制到 文本文件 并命名为 xxx.svg即可
ubuntu 22.04 黑屏
因为安装了 fcitx 和搜狗输入法
于是放弃了搜狗输入法~~ 22.04 自带的输入法也可以
ubuntu 22.04 gnome 插件管理
1 | sudo apt install gnome-shell-extension-manager |
之前是在chrome 里管理 现在可以直接用这个extension了
修改.bashrc 不在终端和标题栏显示用户名密码
搜索 .bashrc 中 \u@\h 符号删除即可~
Ubuntu 22.04 修改启动界面 logo
修改启动界面的LOGO 和 登陆界面的LOGO
1 | cp 新logo.png /usr/share/plymouth/themes/spinner/watermark.png |
GTK 2 和 GTK 3 的问题
有时终端运行窗口, 如qt 或者 终端打开文件管理器 会显示警告
解决:
1 | cd /usr/lib/x86_64-linux-gnu/gtk-2.0/modules/ |
Mathematica 13.1 文档的默认安装位置
由于 Mathematica 13.1 的软件与文档分离 所以需要单独安装文档
13.1 未提供自定义安装路径的选项 Linux 下不使用 sudo 下安装的默认路径为
1 | ~/.Wolfram |
安装渲染引擎 povray
sudo apt install povray
qtcreator 无法输入中文
cp libfcitxplatforminputcontextplugin.so ~/Qt/6.2.3/gcc_64/plugins/platforminputcontexts
文件夹遍历所有子文件夹文件,并复制到另一文件夹中
1 | IFS=$'\n' #设置分隔符为 回车, 确保不会受 文件名中的空格影响 |
https://blog.csdn.net/qq_28686911/article/details/115410830/
窗口最大化隐藏标题栏
插件安装 Pixel Saver https://extensions.gnome.org/extension/723/pixel-saver/
并设置快捷键
小数字键盘 7 移动窗口
小数字键盘 8 切换最大化
小数字键盘9 调整窗口大小
基本就挺好用了
顺便学习一下快捷键
通用快捷键
Alt + F1 类似Windows下的Win键,在GNOME中打开”应用程序”菜单(Applications)
Alt + F2 类似Windows下的Win + R组合键,在GNOME中运行应用程序
Ctrl + Alt + L 类似Windows下的Win + L 组合键,锁定桌面,不同在于同时启动屏幕保护程序
Ctrl + Win + D组合键,显示桌面 直接 Win+D 也可以
Ctrl + Alt + ↑ / ↓ 在不同工作台间切换
Ctrl + Alt + Shift + ↑ / ↓ 移动当前窗口到不同工作台
Ubuntu通用快捷键
PrintScreen 全屏抓图
Alt + PrintScreen 当前窗口抓图
Ctrl+ Alt+ F3-F6 进入全屏终端
Ctrl+ Alt+ F1 F2 返回图形界面
窗口快捷键
Alt + ESC 在不同程序窗口间切换
Alt + Tab 为了兼容Windows下的Alt + Tab组合键习惯,提供的第二个“在不同程序窗口间切换”
Alt + F4 关闭窗口
Alt + F5 取消最大化窗口 (恢复窗口原来的大小)
Alt + F7 移动窗口 (注: 在窗口最大化的状态下无效)
Alt + F8 改变窗口大小 (注: 在窗口最大化的状态下无效)
Alt + F9 最小化窗口
Alt + F10 最大化窗口
Alt + Space 打开窗口的控制菜单 (点击窗口左上角图标出现的菜单)
文件浏览器(部分)
Ctrl+H 显示隐藏文件(切换键)
Ctrl+T 新建标签
Ctrl+W 关闭标签
Ctrl+Page Up 上一个标签
Ctrl+Page Down 下一个标签
Alt+N 切换到第N个标签(N为数字)
Ctrl+L显示地址输入框
命令行快捷键
Ctrl+Shift+T 新建标签页
Alt + 数字 切换标签页
不知道为什么重启开机失败 显示 /dev/nvme0n1p8: clean
疑似问题
1.显卡驱动掉了
卸载原来的驱动
1 | sudo apt-get remove --purge nvidia* |
查看合适的显卡驱动
1 | ubuntu-drivers devices |
显示
== /sys/devices/pci0000:00/0000:00:01.0/0000:01:00.0 ==
modalias : pci:v000010DEd00001F95sv00001028sd000009E2bc03sc00i00
vendor : NVIDIA Corporation
driver : nvidia-driver-460-server - distro non-free
driver : nvidia-driver-470-server - distro non-free
driver : nvidia-driver-495 - distro non-free
driver : nvidia-driver-470 - distro non-free recommended
driver : nvidia-driver-450-server - distro non-free
driver : nvidia-driver-460 - distro non-free
driver : xserver-xorg-video-nouveau - distro free builtin
可以看到 470 是推荐的显卡驱动
安装推荐的显卡驱动
1 | ubuntu-drivers autoinstall |
此时 运行
1 | nvidia-smi |
显示
Tue Dec 28 18:35:17 2021
+——————————————————————————————————————-+
| NVIDIA-SMI 470.86 Driver Version: 470.86 CUDA Version: 11.4 |
|———————————————-+———————————+———————————+
| GPU Name Persistence-M| Bus-Id Disp.A | Volatile Uncorr. ECC |
| Fan Temp Perf Pwr:Usage/Cap| Memory-Usage | GPU-Util Compute M. |
| | | MIG M. |
|===============================+======================+======================|
| 0 NVIDIA GeForce … Off | 00000000:01:00.0 Off | N/A |
| N/A 52C P8 3W / N/A | 8MiB / 3911MiB | 0% Default |
| | | N/A |
+———————————————-+———————————+———————————+
+——————————————————————————————————————-+
| Processes: |
| GPU GI CI PID Type Process name GPU Memory |
| ID ID Usage |
|=============================================================================|
| 0 N/A N/A 4159 G /usr/lib/xorg/Xorg 4MiB |
+——————————————————————————————————————-+
说明显卡安装成功,然而重启之后并没有卵用,错误未消失,因此原因并不在显卡驱动
其实 在开机引导界面 按 e 修改 quiet splash 为 quiet splash nomodeset 禁用掉显卡驱动就可以进入那一般是显卡驱动的问题,然而这次我设置了quiet splash nomodeset并没有卵用,这是第二个不是显卡驱动问题的证据
2.驱动安装不匹配
解决办法为
1 | sudo rm /etc/X11/xorg.conf |
不过我的情况是 /etc/X11/中并没有 xorg.conf 文件,因此这也不是我开不了机的原因
3.缺少 ubuntu-desktop
重弄新安装ubuntu-desktop
1 | sudo apt install ubuntu-desktop |
问题得到解决。。。实际上,我居然不知道什么时候 ubuntu-desktop没了。。。这也许是永远的谜,只是简单的重新启动,ubuntu-desktop 就可以被弄没吗? who knows…
好吧 原来是我为了解决 下面那个GTK 模块导入问题不小心把 sudo apt remove libcanberra-gtk* 导致的。。。所以不要卸载 只将他们改成.bak后缀就行了
参考:
GTK 模块导入问题
Gtk-WARNING : 13:34:57.489: GTK+ module /usr/lib/x86_64-linux-gnu/gtk-2.0/modules/libcanberra-gtk-module.so cannot be loaded.
GTK+ 2.x symbols detected. Using GTK+ 2.x and GTK+ 3 in the same process is not supported.
Gtk-Message: 13:34:57.489: Failed to load module “canberra-gtk-module”
Gtk-WARNING : 13:59:18.971: GTK+ module /usr/lib/x86_64-linux-gnu/gtk-2.0/modules/libgail.so cannot be loaded.
GTK+ 2.x symbols detected. Using GTK+ 2.x and GTK+ 3 in the same process is not supported.
Gtk-Message: 13:59:18.972: Not loading module “atk-bridge”: The functionality is provided by GTK natively. Please try to not load it.
一共有三个问题
1.canberra-gtk-module 无法导入
1 | sudo mv libcanberra-gtk-module.so libcanberra-gtk-module.so.bak |
后来发现也可以用软连接 连接到gtk3 的模块上 但是libgail.so 没有gtk3 版本,就无法用这种方法
1 | ln -s /usr/lib/x86_64-linux-gnu/gtk-3.0/modules/libcanberra-gtk3-module.so ./libcanberra-gtk-module.so |
2.libgail.so 无法导入 安装了但是无法正确导入
1 | sudo mv libgail.so libgail.so.bak |
3.atk-bridge 无法导入 (警告说这个是gtk自动导入的,所以直接改成.bak 后缀即可)
1 | sudo mv libatk-bridge.so libatk-bridge.so.bak |
这样就不报警告了 但是不是很懂这样会有什么问题,以后再说吧,现在不浪费时间了
下载神器 ^_^
1 | sudo snap install video-downloader |
https://snapcraft.io/video-downloader
在终端启动
下载外网视频 记得开启终端的代理。。。
深度终端 ssh 配置
ssh 免密码登录
一、生成rsa类型免密的公钥。
1 | ssh-keygen -t rsa -P "" |
二、将公钥通过命令ssh-copy-id放入node02机器上。
1 | ssh-copy-id yourname@192.168.x.x |
还有别的问题
1 | expect -f /tmp/deepin-terminal-6KR2E1 |
master-pdf
deepin-wine kg.exe
.deb 包本地安装
dpkg -x deb dir
解压后自己添加环境变量即可。。。
桌面图标 与 文件管理器 nautilus 无法拖拽的问题
这个问题终于被人解决了。。。
安装
在genome 插件网站打开。。。
https://extensions.gnome.org/extension/2087/desktop-icons-ng-ding/
设置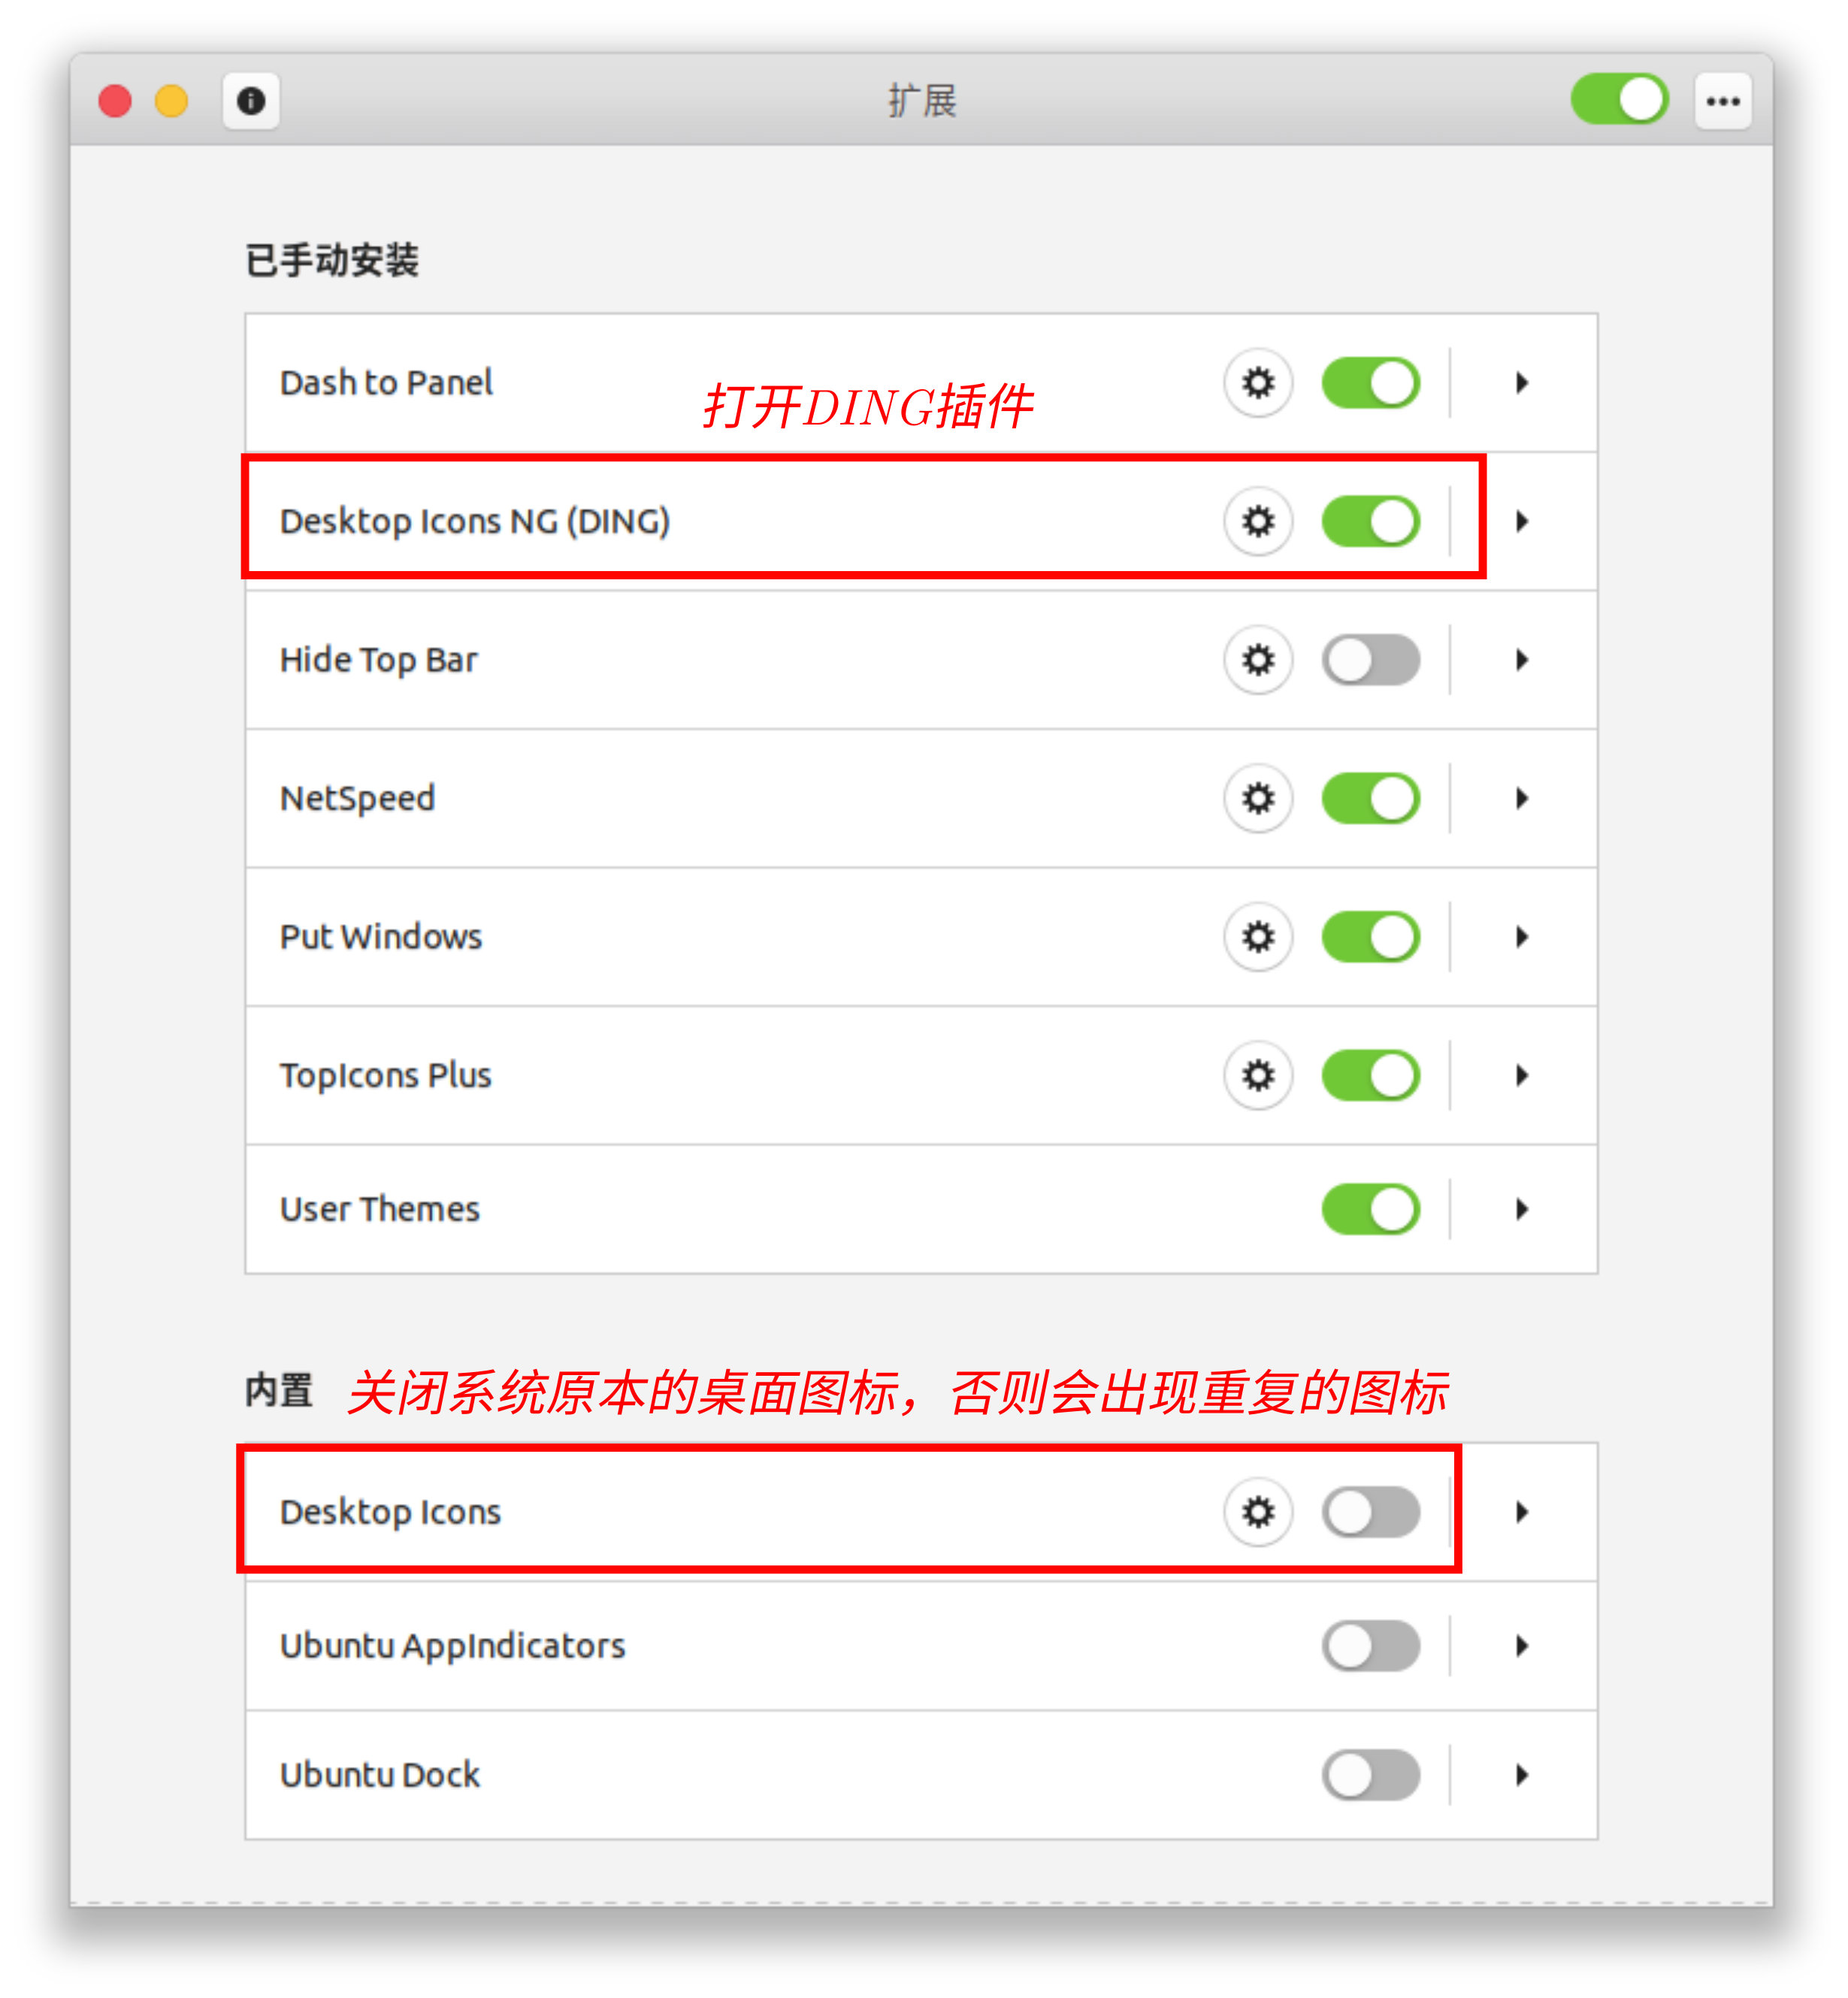
在桌面右键点击settings设置即可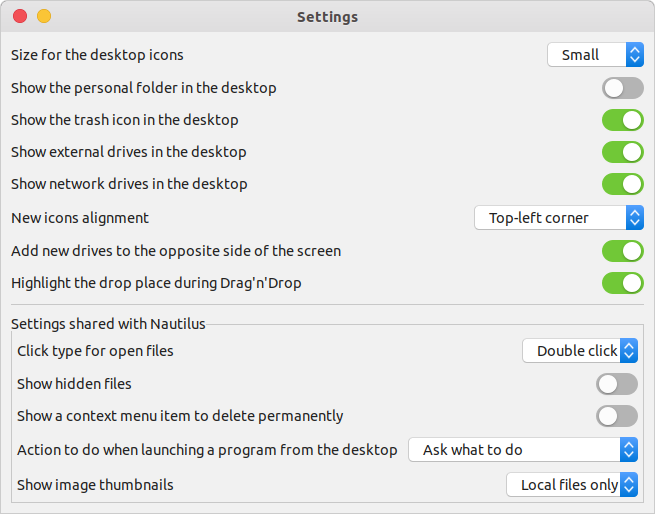
现在可以自由拖拽 复制粘贴了 爽歪歪
https://extensions.gnome.org/extension/2087/desktop-icons-ng-ding/
https://ubuntuhandbook.org/index.php/2020/10/enable-drag-drop-desktop-ubuntu-20-04/
geogebra 安装
1 | sudo apt-add-repository -u 'deb http://www.geogebra.net/linux/ stable main' |
提示没有公钥
1 | W: GPG 错误:http://www.geogebra.net/linux stable InRelease: 由于没有公钥,无法验证下列签名: NO_PUBKEY C072A32983A736CF |
下载公钥并下载geogebra
1 | sudo apt-key adv --keyserver keyserver.ubuntu.com --recv-keys C072A32983A736CF |
然而并不能用。。。 支持的也太差了
https://wiki.geogebra.org/en/Reference:GeoGebra_Installation
https://blog.csdn.net/weixin_44172434/article/details/89160720
chrome插件 WebToEpub
在线电子书下载!
ranger 安装插件 ranger_devicons 显示文件图标
下载 需要的 Ubuntu Mono Nerd Font Complete Mono.ttf 字体并双击安装
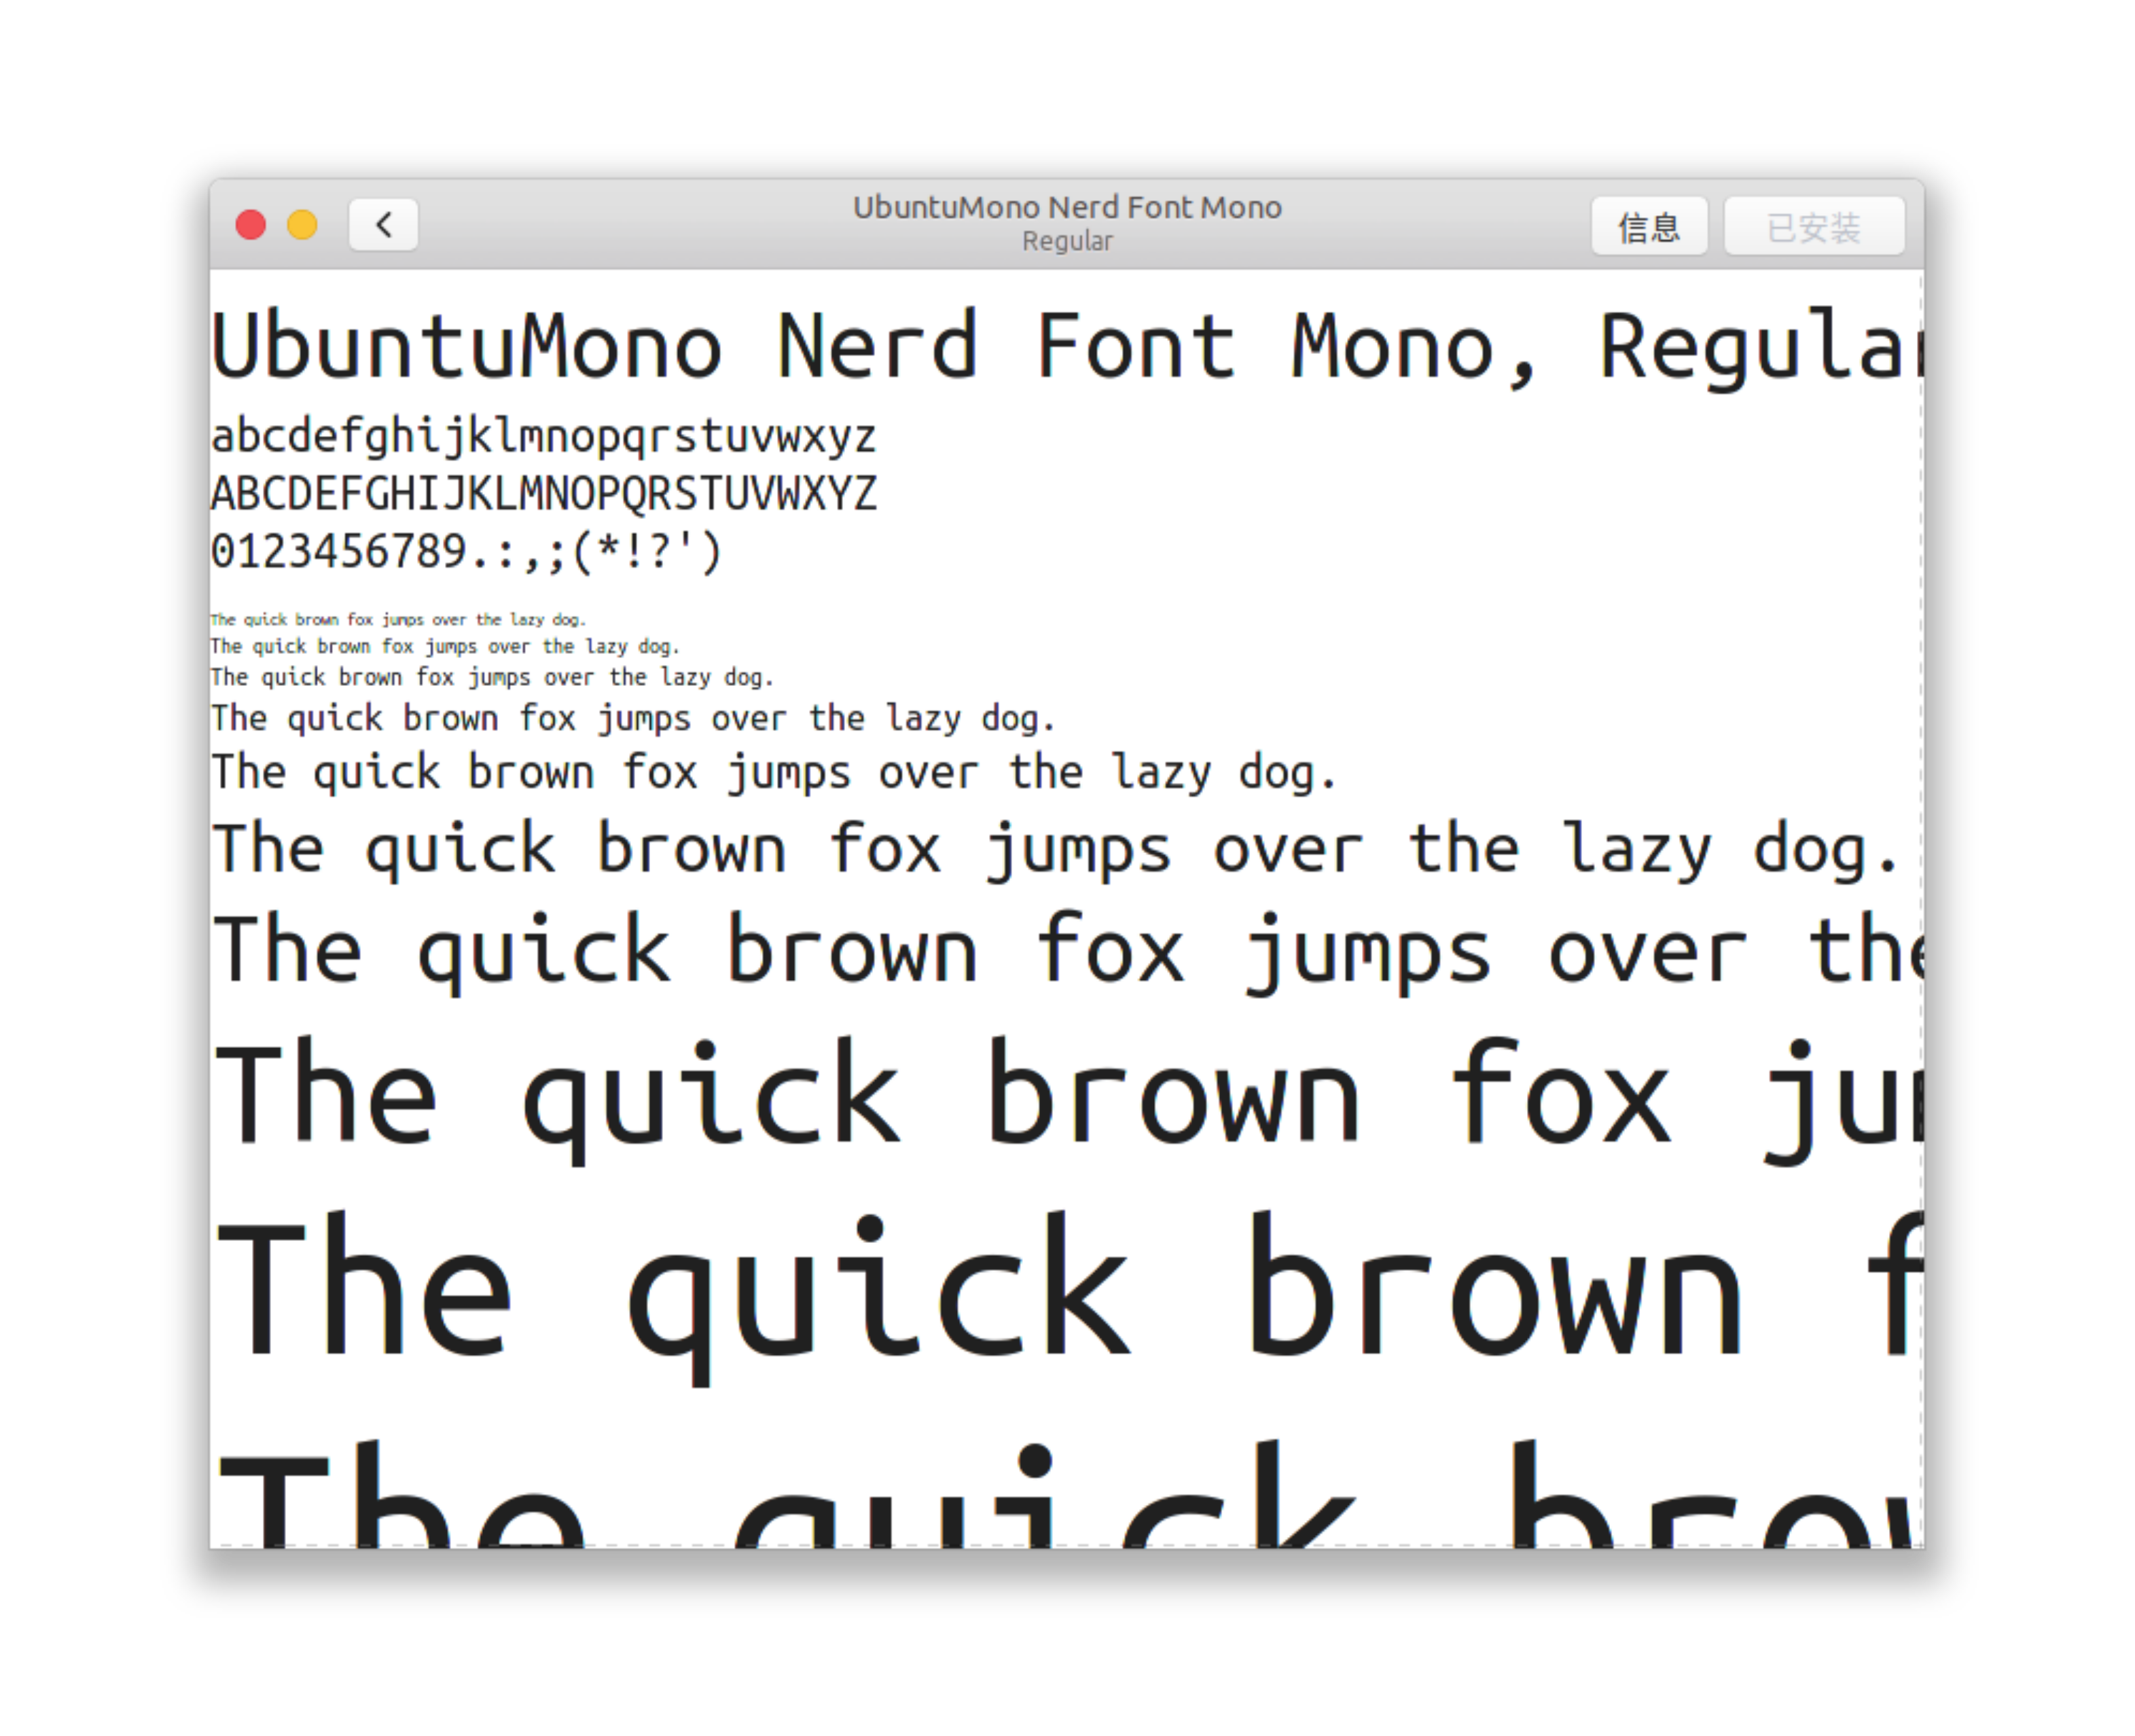
安装 ranger 插件
1 | git clone https://github.com/alexanderjeurissen/ranger_devicons ~/.config/ranger/plugins/ranger_devicons |
大功告成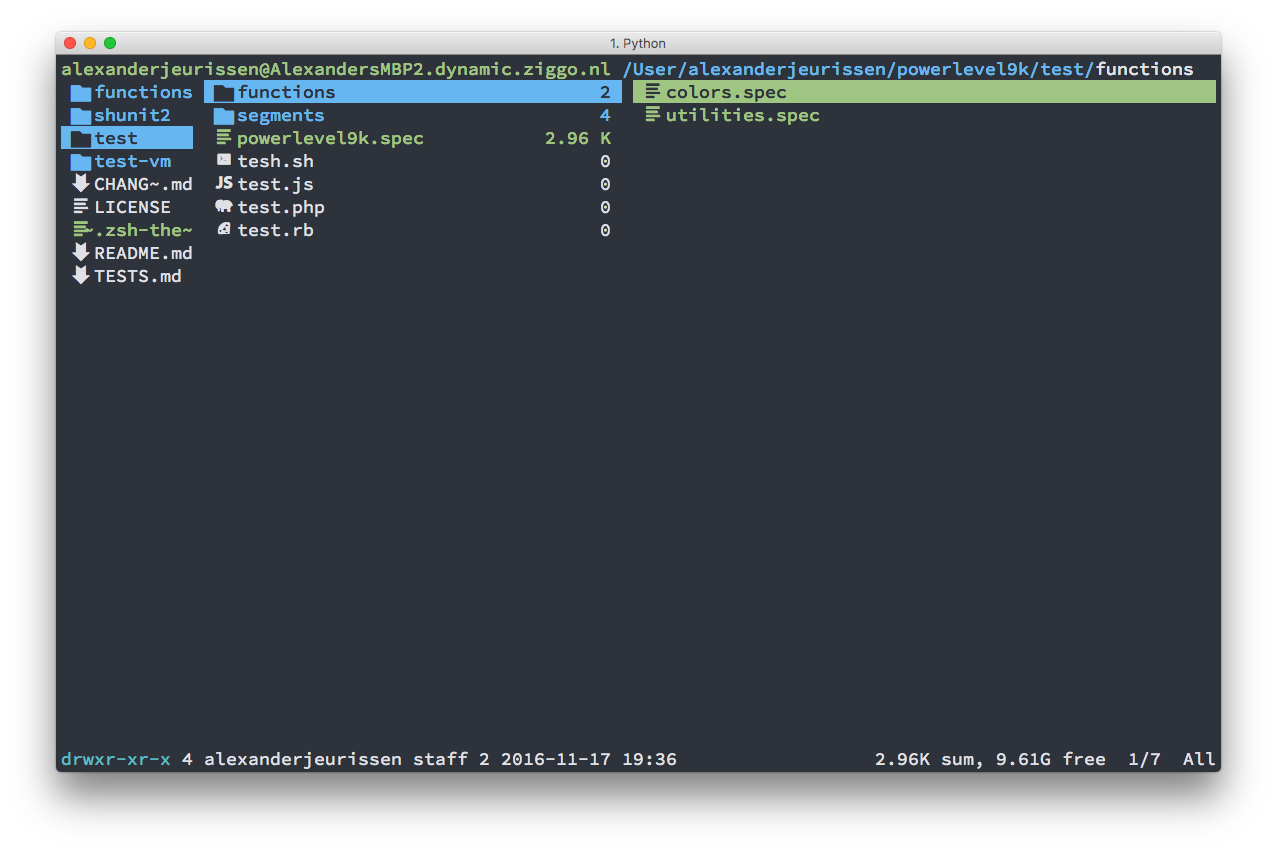
设置脚本开机自启动
大家知道,crontab 是 Linux 下的计划任务,当时间达到我们设定的时间时,可以自动触发某些脚本的运行。
我们可以自己设置计划任务时间,然后编写对应的脚本。但是,有个特殊的任务,叫作 @reboot ,我们其实也可以直接从它的字面意义看出来,这个任务就是在系统重启之后自动运行某个脚本。
那它将运行的是什么脚本呢?我们如何去设置这个脚本呢?我们可以通过 crontab -e 来设置。
1 | crontab -e |
更改默认编辑器为 vim
1 | vim .bashrc |
thunder bird 添加邮箱
- 到邮箱网页版开启 imap服务 (感觉 pop3 不好)(每种邮箱开启方法不同 请自行百度)
例如 北京师范大学邮箱配置 在这个网站
https://email.bnu.edu.cn/coremail/help/clientoption_zh_CN.jsp#display_01
- 按thunder bird 提示完成配置就行了
- google 邮箱需要设置 thunder bird 代理才能登录
- 注册 google 账号需要用手机 vpn
使用手机注册。(1).保证手机在“科学上网全局模式”下,(2).把手机自带的语言系统设置成英文,(3).同时将手机谷歌浏览器的语言也设置为英文,再注册谷歌广告账号就可以用中国手机号码验证,并成功注册了!
https://zhuanlan.zhihu.com/p/358448859
我甚至没改语言就行了https://blog.csdn.net/QingShanTang/article/details/79094087
https://jingyan.baidu.com/article/3c343ff7d492490d3779630b.html
不改变顺序删除重复的行
http://edyfox.codecarver.org/html/bash_unique_lines_no_sorting.html
http://www.unixcl.com/2008/03/remove-duplicates-without-sorting-file.html
录音软件 Audio Recorder 和 音频处理 Audacity
1 | sudo apt install audacity |
xdotool 实现快捷键 typora多颜色高亮
1 | sudo apt install xdotool |
写入脚本 xxx.sh
1 |
|
赋予执行权限
1 | chmod 755 xxx.sh |
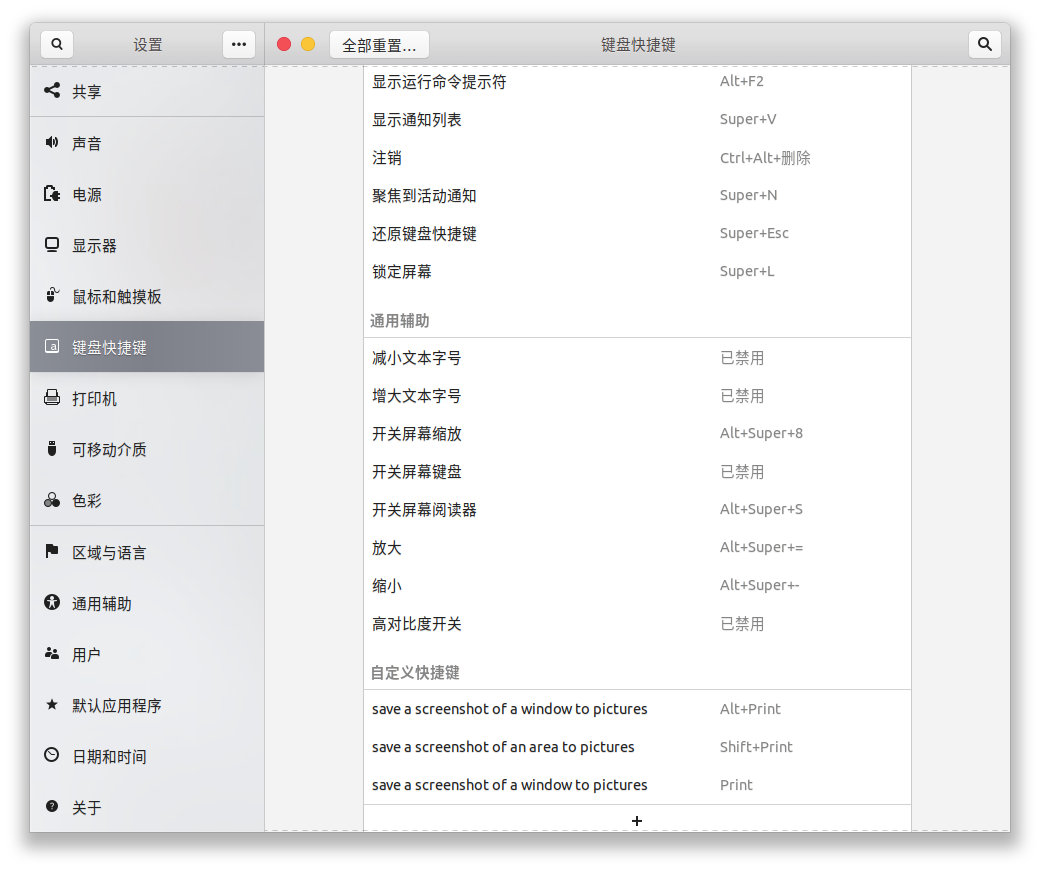
最后,把脚本设置为快捷键
Ubuntu 设置>键盘快捷键>自定义快捷键
命令为 脚本路径
这样就可以一键高亮,不过每种颜色都需要单独设置快捷键
清除脚本 ,操作同上,选中已经高亮的文本,按下快捷键即可清除高亮
1 |
|
https://m.linuxidc.com/Linux/2014-08/105996.htm
https://qastack.cn/ubuntu/872695/how-to-create-a-shortcut-that-executes-an-xdotool-command-to-simulate-a-key-pres
https://github.com/jordansissel/xdotool/issues/184
系统根目录空间不足 扩容 gparted
下载安装 gparted live
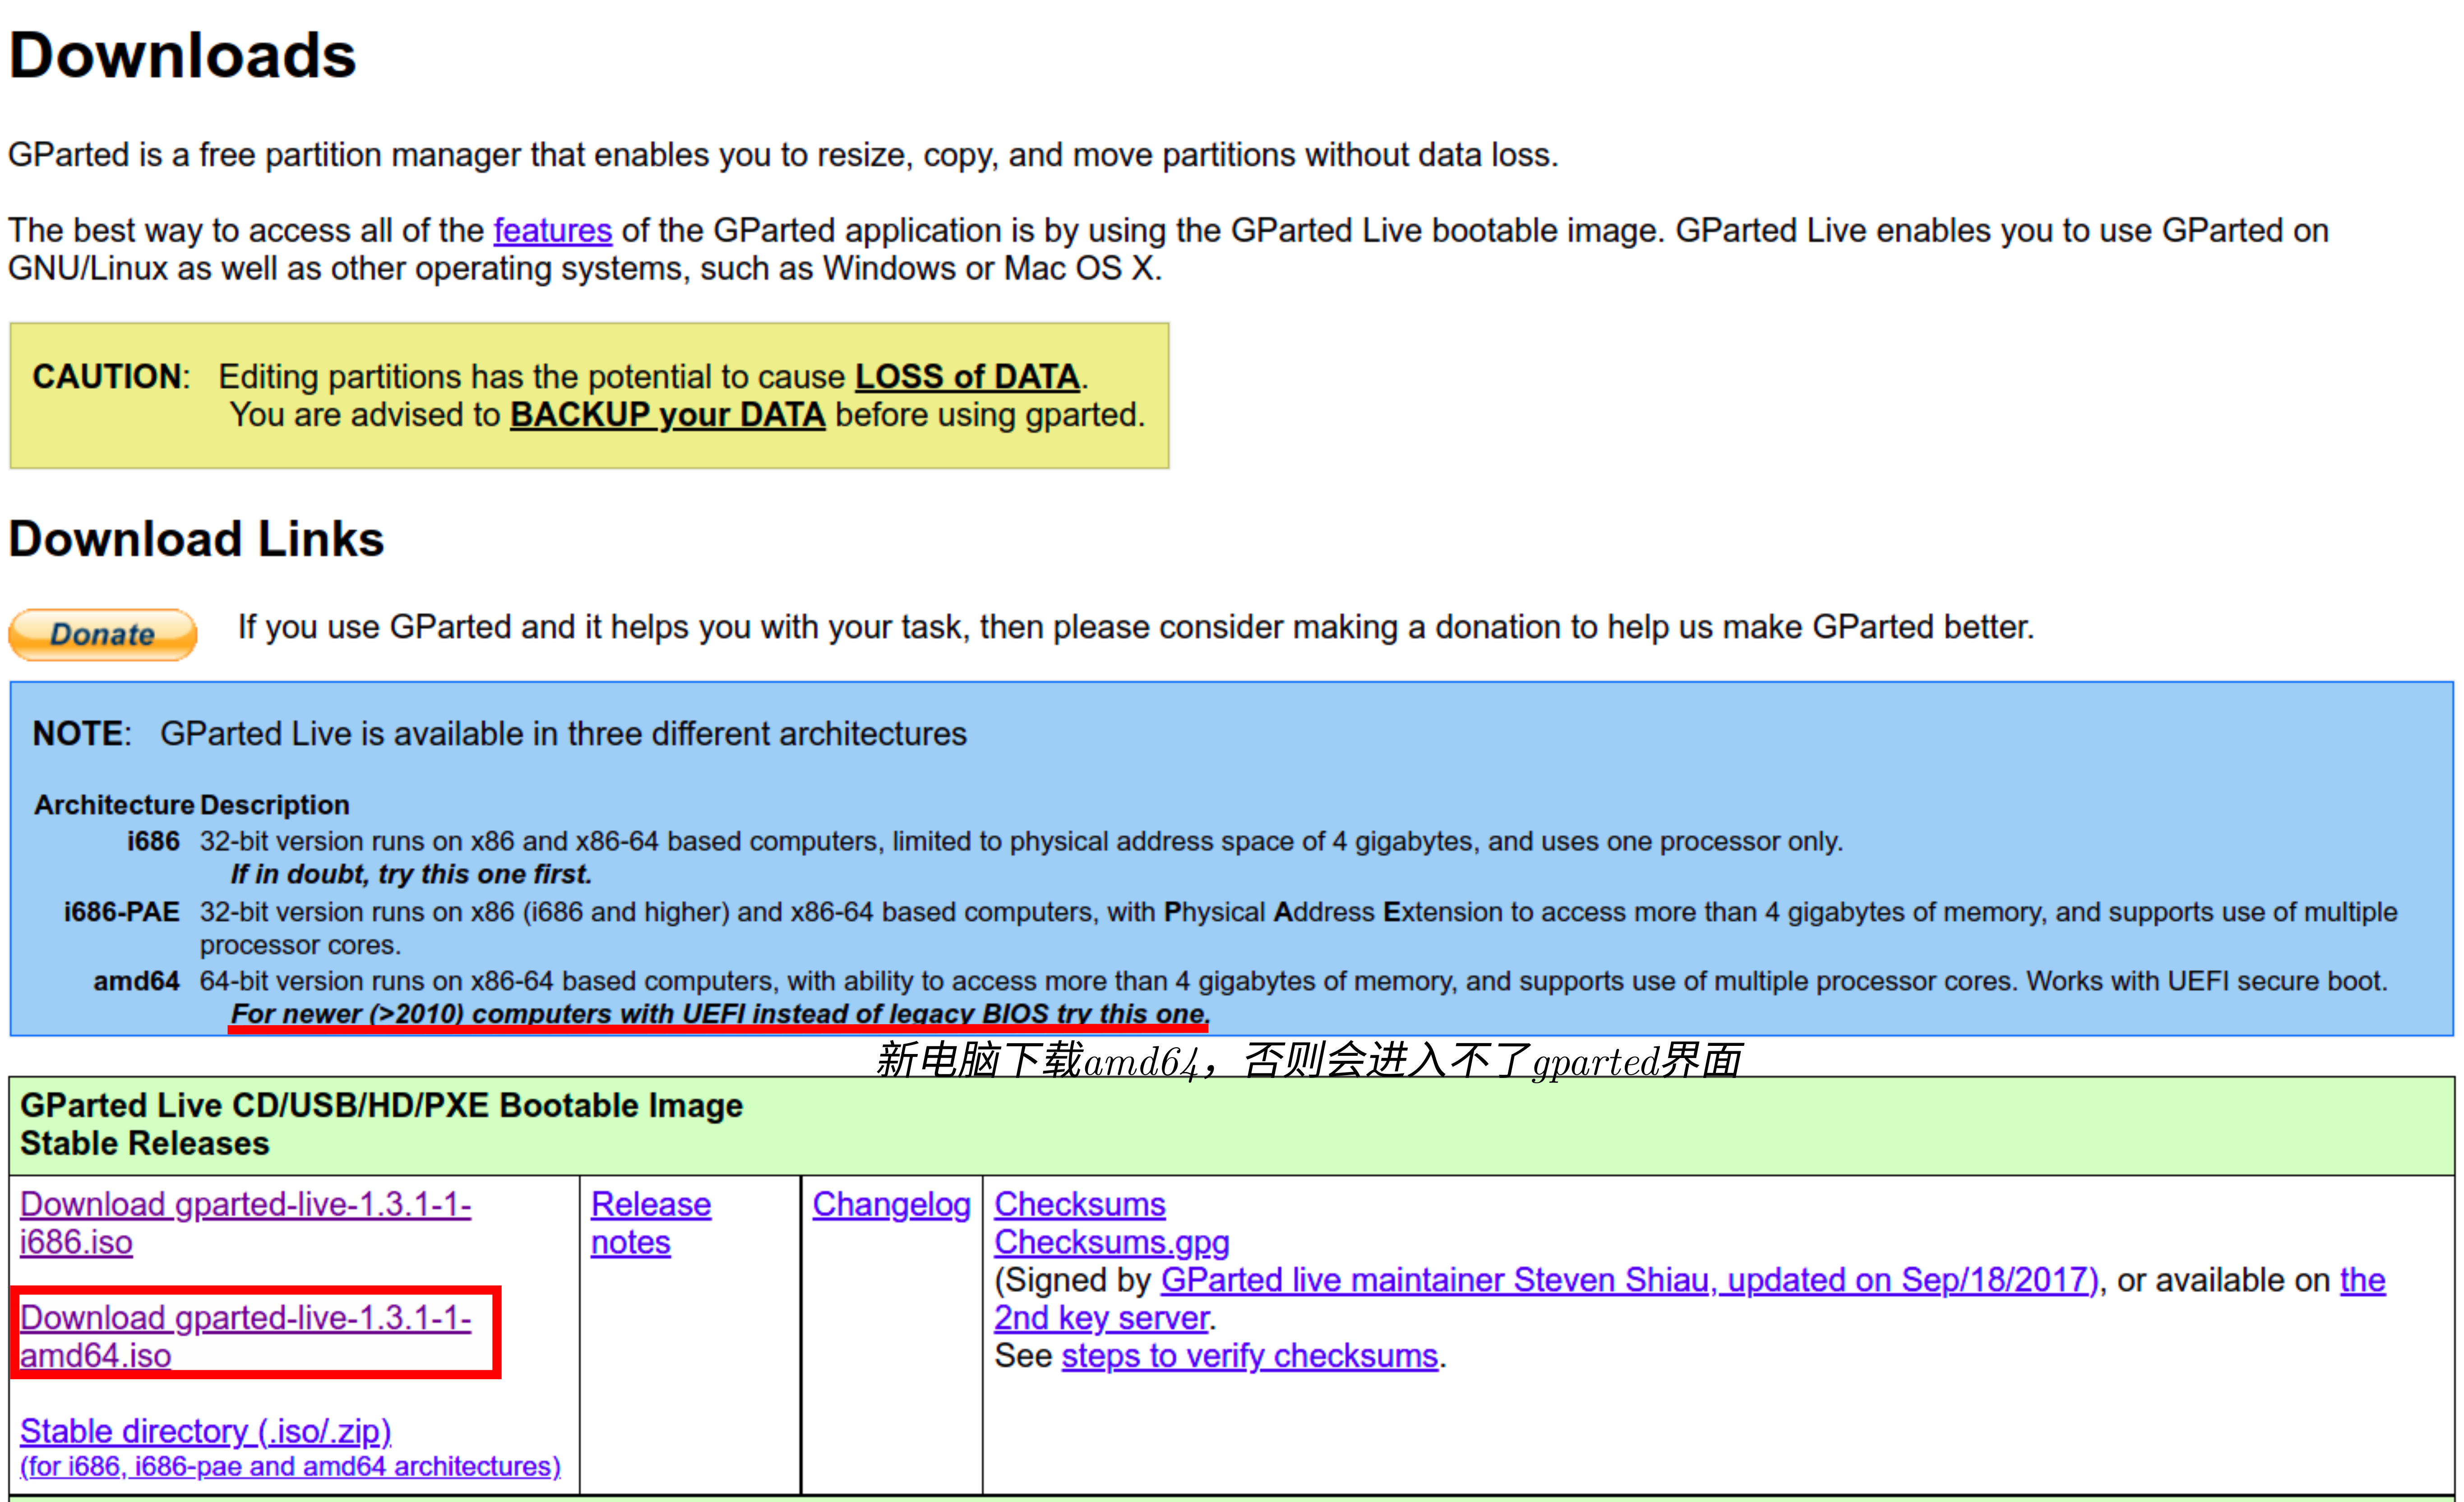
选择适合的版本,下载之后制作U盘启动盘
重启电脑,开机F12进入BIOS ,关闭安全启动项,选择U盘启动
一路默认就好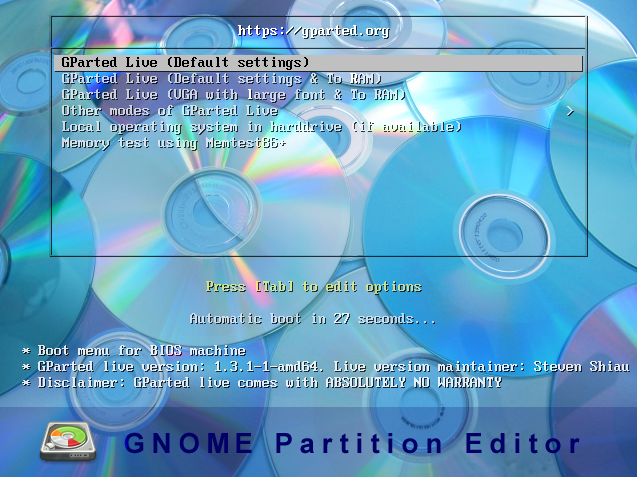
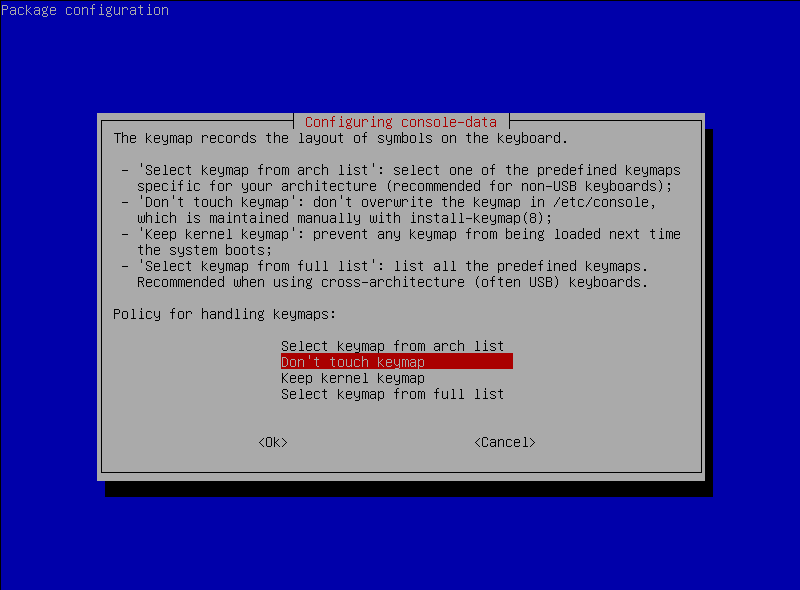
当然 你也可以选择26 中文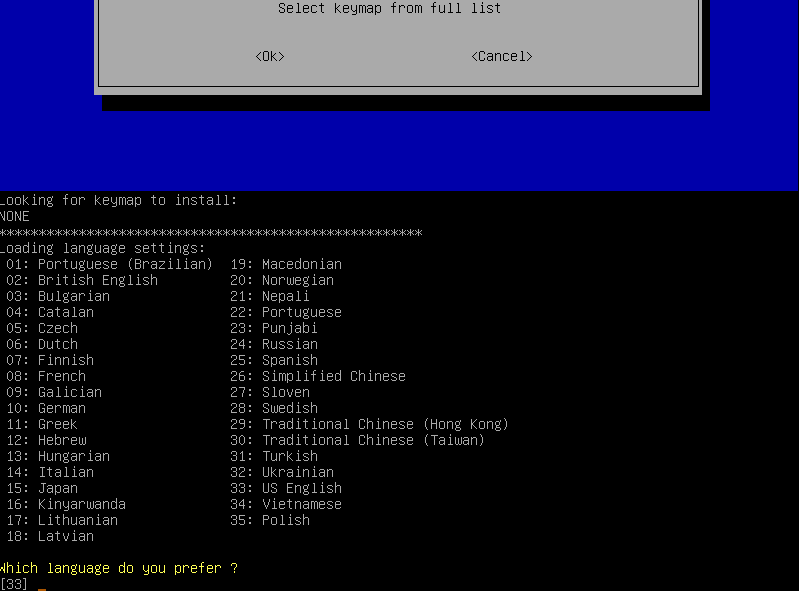
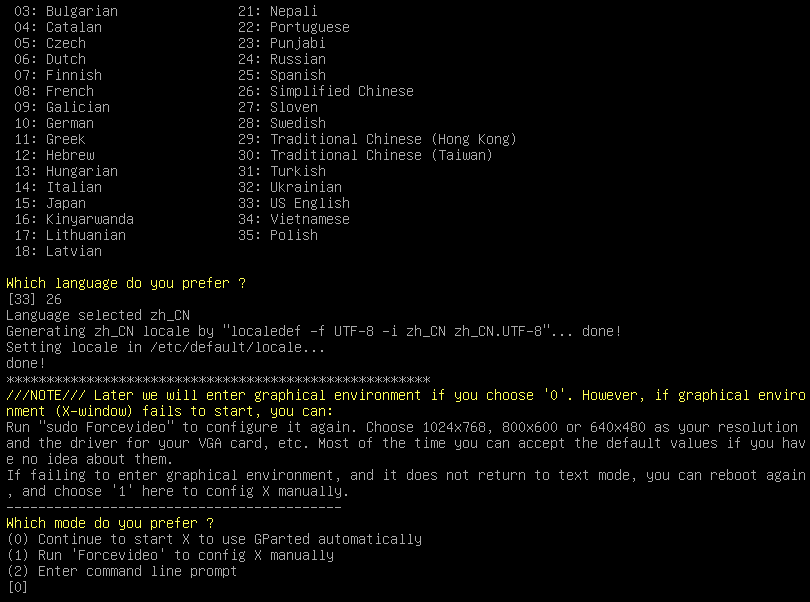
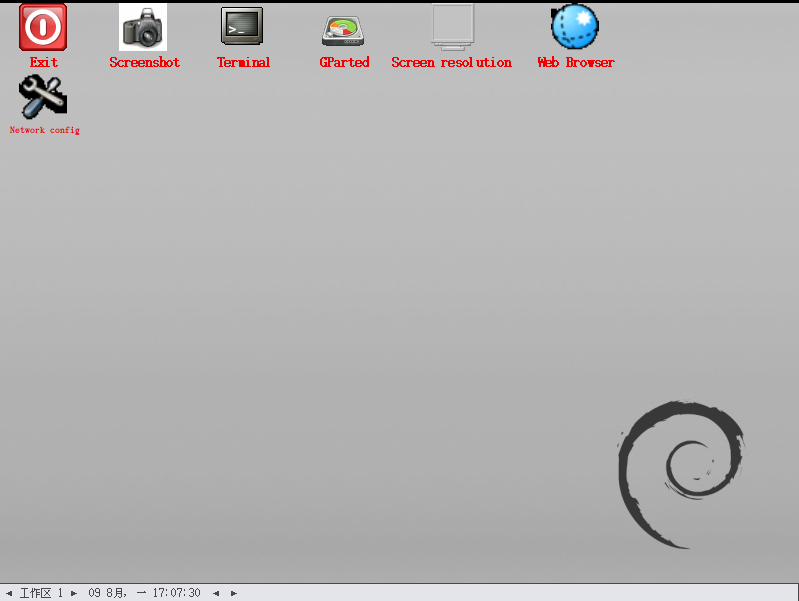
为了方便,我截图截的是 Ubuntu 开机之后的图形化界面的gparted(因为已经挂载了,所以在Ubuntu里面的gparted无法分区,因而需要U盘启动), U盘引导的跟这个差不多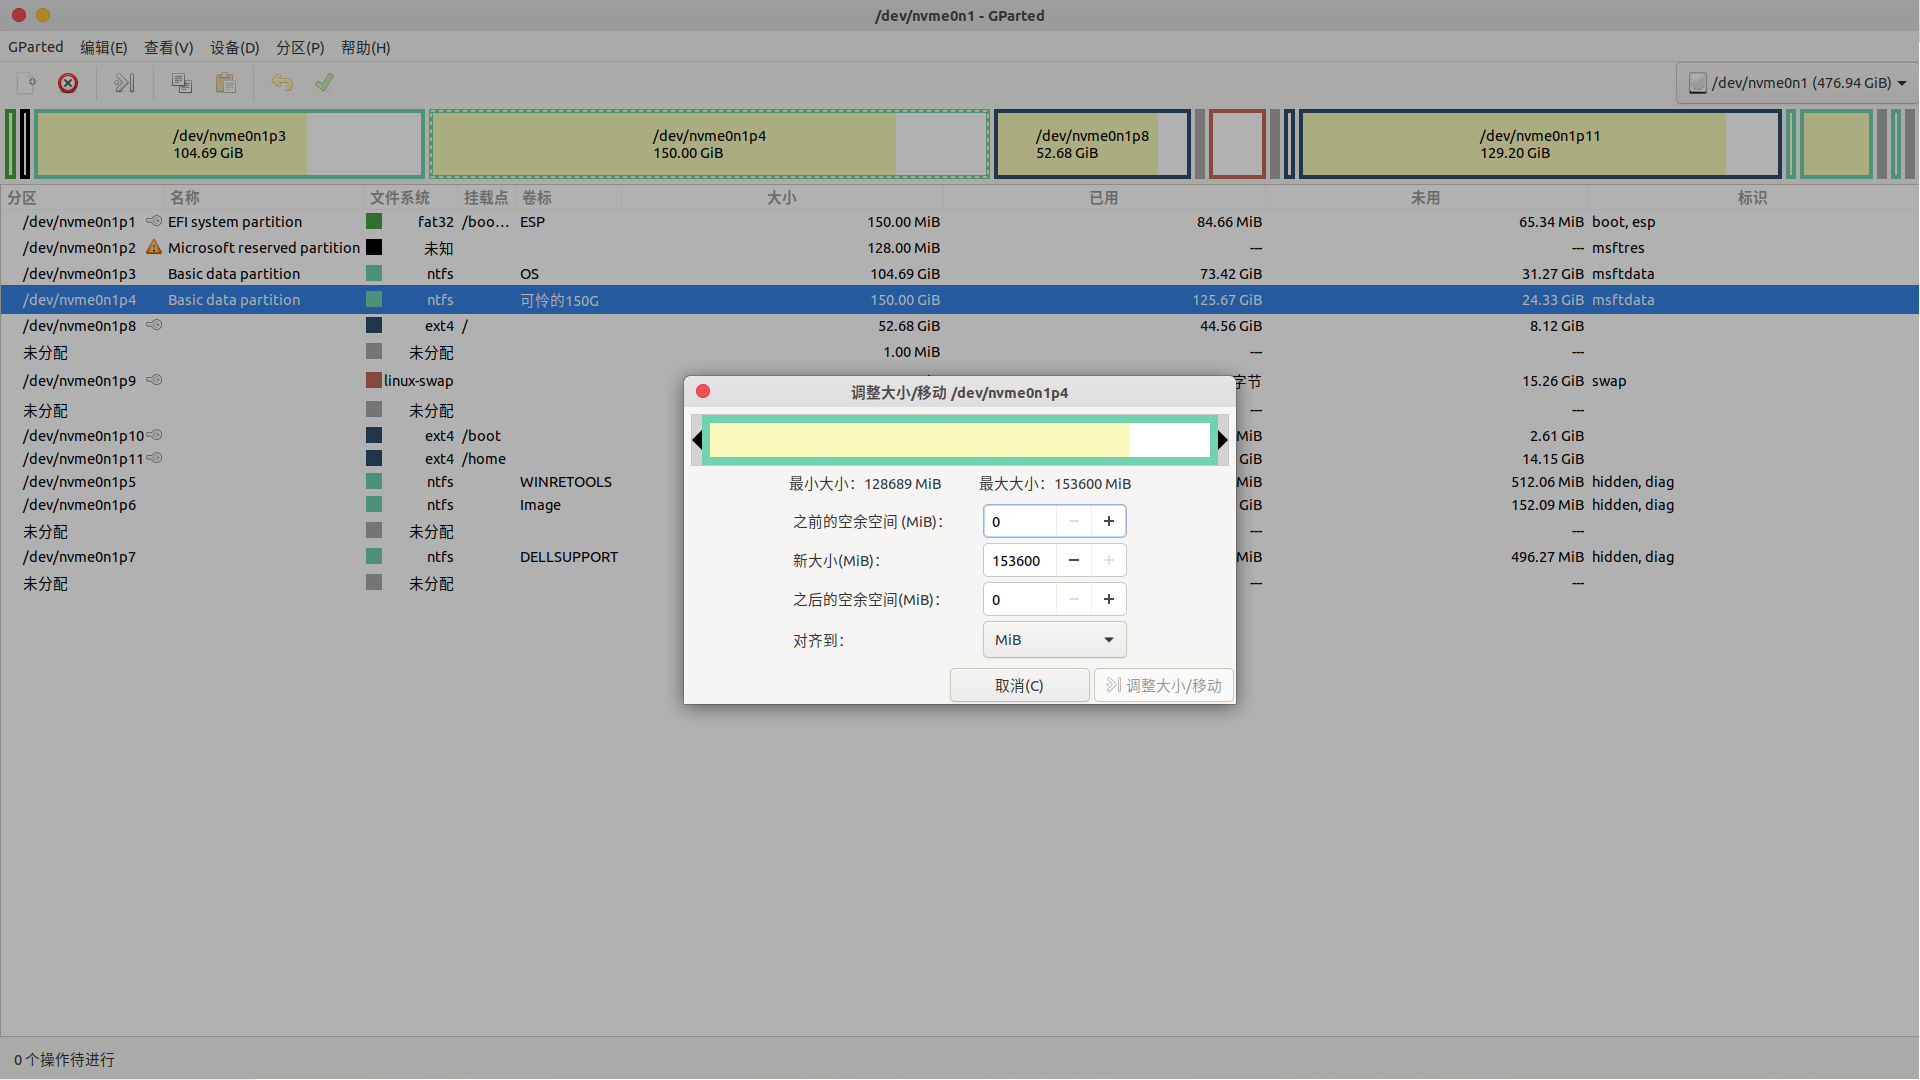
分区很简单,需要注意的是只能合并相邻的区,具体分区如果不会可参考
或者Google.
重启电脑,成功进入电脑,查看根目录 / 的空间,成功扩大了!
ubuntu 20.04内核更新 导致 vmware16.0.0 无法安装模块 vmmon
1 | wget https://github.com/mkubecek/vmware-host-modules/archive/workstation-16.0.0.tar.gz |
FFmpeg
合并多个视频
https://blog.csdn.net/winniezhang/article/details/89260841
https://www.jianshu.com/p/dcd64accd18c
例如 你有 0.mp4 到 5.mp4则可以 用ls 列出所有文件 然后编辑文件列表 最后进行合并:
1 | ls [0-9].mp4 > filelist.txt && vim -c '%s/^/file /g|wq' filelist.txt && ffmpeg -f concat -safe 0 -i filelist.txt -c copy output.mp4 |
某天在合成 mp4 视频时 报错 Non-monotonous DTS in output stream ...
解决,先将 mp4 文件转换为 mts 文件再合并
1 | for f in ./*.mp4; do ffmpeg -i $f -q 0 "${f%.*}.mts"; done |
基本参数及命令
作者:Brian512
链接:https://www.jianshu.com/p/11b6c4eb9e49
来源:简书
著作权归作者所有。商业转载请联系作者获得授权,非商业转载请注明出处。
1 | // 去掉视频中的音频 |
参数说明:
-vcodec xvid 使用xvid压缩
-s 320x240 指定分辨率
-r fps 设置帧频 缺省25
-b <比特率> 指定压缩比特
-acodec aac 设定声音编码
-ac <数值> 设定声道数,1就是单声道,2就是立体声
-ar <采样率> 设定声音采样率,PSP只认24000
-ab <比特率> 设定声音比特率
-vol <百分比> 设定音量
-y(覆盖输出文件
-t duration 设置纪录时间 hh:mm:ss[.xxx]格式的记录时间也支持
-ss position 搜索到指定的时间 [-]hh:mm:ss[.xxx]的格式也支持
-title string 设置标题
-author string 设置作者
-copyright string 设置版权
-hq 激活高质量设置
-aspect aspect 设置横纵比 4:3 16:9 或 1.3333 1.7777
-croptop size 设置顶部切除带大小 像素单位
-cropbottom size -cropleft size -cropright size
-padtop size 设置顶部补齐的大小 像素单位
-padbottom size -padleft size -padright size -padcolor color 设置补齐条颜色(hex,6个16进制的数,红:绿:兰排列,比如 000000代表黑色)
-bt tolerance 设置视频码率容忍度kbit/s
-maxrate bitrate设置最大视频码率容忍度
-minrate bitreate 设置最小视频码率容忍度
-bufsize size 设置码率控制缓冲区大小
-vcodec codec 强制使用codec编解码方式。 如果用copy表示原始编解码数据必须被拷贝。
-sameq 使用同样视频质量作为源(VBR)
-pass n 选择处理遍数(1或者2)。两遍编码非常有用。第一遍生成统计信息,第二遍生成精确的请求的码率
-passlogfile file 选择两遍的纪录文件名为file
-map file:stream 设置输入流映射
-debug 打印特定调试信息
OCR 截图识别中英文
https://www.bilibili.com/video/BV1e7411w7Lo
https://blog.csdn.net/weixin_39949673/article/details/111116693
https://blog.csdn.net/weixin_44922452/article/details/106545049
最重要的是要指定 tesseract 的语言包的文件 为 -l eng+chi_sim
以及 用 vim 删除 空白行 sed 实在是不会用 有时间再学 awk sed grep 把。。。
1 |
|
vim 比较慢, 还是换回了sed 。。。
1 | #!/bin/env bash |
sed 去除回车键貌似有点麻烦 参考
deepin 终端设置
将 deepin 终端设置为默认终端
ubuntu没有直接设置deepin-terminal为默认终端的方式,所以采用先安装其他终端,然后替换其他终端的方式
1 | sudo apt install deepin-terminal |
ubuntu 20.04右键打开深度终端
安装对应软件
1 | sudo apt-get install filemanager-actions |
Edit->Preferences->取消勾选Create a root ‘FileManager-Actions’ Menu
https://blog.csdn.net/weixin_42113967/article/details/113925048
https://askubuntu.com/questions/1138673/is-filemanager-actions-working-with-19-04
http://qianghaopeng.gitee.io/blog/2019/08/24/ubuntu18-04%E5%AE%89%E8%A3%85%E5%92%8C%E8%AE%BE%E7%BD%AE%E6%B7%B1%E5%BA%A6%E7%BB%88%E7%AB%AF/#more
安装字体
ttf-mscorefonts-installer 安装
1 | sudo apt update |
如果还是没有
1.
找一台Windows电脑,进入 C:\Windows\Fonts,你需要的字体文件都在里面.
如果你安装的是双系统,就可以直接把里面的文件拷到ubuntu里.例如,如果需要微软雅黑,
就要拷贝 msyh.ttc,msyhl.ttc,msyhbd.ttc三个文件.
2.
把字体文件放到ubuntu的fonts文件夹里,你可以新建一个myfonts文件夹
1 | cd /usr/share/fonts |
3.
记录安装新字体
1 | sudo mkfontscale |
现在你应该可以在ubuntu使用新字体了,可以打开wps看看是否安装成功.
繁体简体切换
突然发现输入法变成繁体了, 解决: ctrl+shift+f
ppa 源速度太慢
ustc镜像就有ppa的反向代理。每个ppa都会在/etc/apt/sources.list.d 目录下创建一个list文件。只需要将其中的http://ppa.launchpad.net替换为https://launchpad.proxy.ustclug.org就行。
注意是 https:
参考:https://www.zhihu.com/question/382334154/answer/1131393495
https://www.cnblogs.com/bluedawn/p/LaunchpadPPABoost.html
坚果云安装
需要从源代码编译,并且不要设置你自己的安装路径
默认 ./configure就好!
inkscape 1.01
扩展->文字->改变大小写
报错:
1 | /usr/lib/python3/dist-packages/apport/report.py:13: DeprecationWarning: the imp module is deprecated in favour of importlib; see the module's documentation for alternative uses |
原来在 /usr/share/inkscape/extensions/inkex/extensions.py 里的第 315 行
1 | def effect(self): |
居然 .values() 了两边,所以删掉第二个 .values():
1 | def effect(self): |
完美解决。。
Scatter 散布的错误 ===============
把 /usr/share/inkscape/extensions/pathscatters.py里面的 # center at (0,0) 之下的代码改为
1 | # center at (0,0) |
虽然不报错了,不过结果感觉还是不对。。。
可以持续关注这个问题:
https://gitlab.com/inkscape/extensions/-/issues/295#note_492290064
inkscape 1.01 Latex 插件 textext
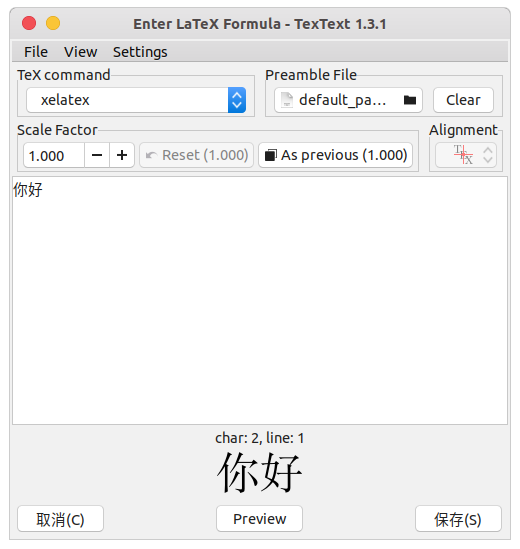
在preamble 可以添加导言区文件,在导言区添加\usepackage{ctex}并使用 xelatex 编译,你甚至能渲染中文。
在导言区添加 \usepackage{tikz}, 你甚至可以再 inkscape 里面使用 tikz 画图。。。
预览 HEIC 文件 。。。
1 | sudo apt update |
然后用图像查看器看就行了。。。
参考
https://askubuntu.com/questions/1298595/how-to-view-heic-photos-from-iphone-ios-11-on-ubuntu
wine-mono 和 wine-gecko 插件安装
wine在初次安装并在终端输入winecfg后,会自动下载安装wine-mono和wine-gecko两个插件,但是自动下载会很慢,而且还不一定能下载成功,因此最好选择手动下载。本文的步骤参考于这篇博客:https://blog.csdn.net/qq_41343094/article/details/105748180#wine__16
这里提一下,wine-mono和wine-gecko在“中国科技大学镜像源”中可以找到相关的安装包,下面都是介绍安装最新版的wine-mono和wine-gecko。
安装wine-mono
首先进入
http://mirrors.ustc.edu.cn/wine/wine/wine-mono/
点击wine-mono-5.0.0-x86.msi并下载。
下载之后,打开终端,进入文件所下载的目录,执行
wine start /i wine-mono-5.0.0-x86.msi
随后我们验证一下是否安装成功。终端打开winetricks:
winetricks
如果你的ubuntu没有安装winetricks,那么执行下面语句安装即可:
sudo apt install winetricks
进入winetricks后,依次选择:【选择默认的wine容器】→【运行卸载程序】,在弹出的界面中,如果发现了wine-mono的相关软件,则说明wine-mono安装成功了。
安装wine-gecko
下载和安装方法和wine-mono一样。在以下网址:http://mirrors.ustc.edu.cn/wine/wine/wine-gecko/2.47.1/下载wine-gecko-2.47.1-x86_64.msi 和wine-gecko-2.47.1-x86.msi ,然后使用以上安装mono的方式安装:
wine start /i wine-gecko-2.47.1-x86.msi
wine start /i wine-gecko-2.47.1-x86_64.msi
老样子,打开winetricks依次选择:【选择默认的wine容器】→【运行卸载程序】,在弹出的界面中,如果发现了wine-gecko的相关软件,则说明wine-gecko安装成功。
转自 https://blog.csdn.net/u010164190/article/details/106785069
编译wine
1 | ./configure --prefix=/home/qinjin/wine |
报错:configure: error: Cannot build a 32-bit program, you need to install 32-bit development libraries.
1 | ./configure --prefix=/home/qinjin/wine --enable-win64 |
报错:
configure: error: no suitable flex found. Please install the ‘flex’ package.
configure: error: no suitable bison found. Please install the ‘bison’ package.
1 | sudo apt install flex |
然后make就行了。。。
pdf 编辑工具 krop+pdftk
最近写论文的时候想直接把别人文章里面的图片扒下来。。。。。
krop 在ubuntu的商店里可以找到,特别方便感觉,可以用鼠标在一页上同时裁剪多个区域并且可以自动去除图片周围的白边
点击这个 individual page 就可以单页裁剪,否则多页pdf的相同位置都会被裁剪掉。。。
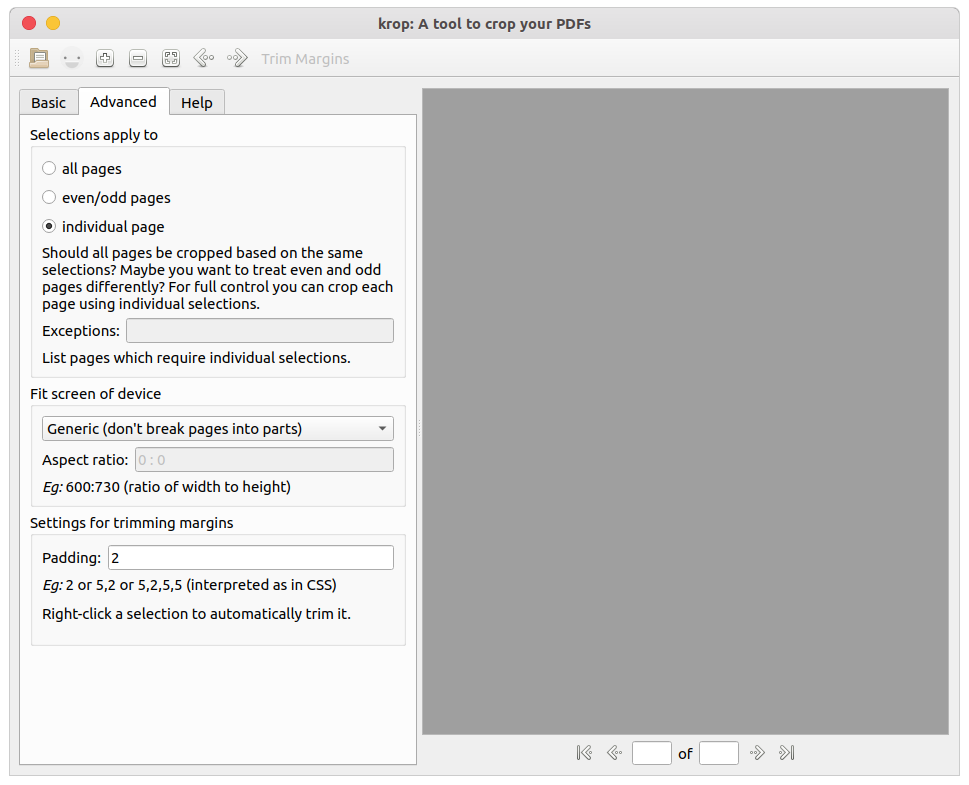
然后需要把生成的pdf分成单页,于是使用 pdftk(sudo apt get install pdftk 安装),运行最后一行的命令即可
1 | pdftk 1.pdf 2.pdf 3.pdf cat output 123.pdf |
完美地把人家的图给扒下来了。。。
=======================================================================================
Ubuntu 20.04 安装 Matlab R2020b
从官网下载用教育邮箱注册的学术Linux版
解压安装文件,进入目录并执行 sudo ./install 进行安装特别注意用户登录名为 root, 启动时使用 sudo matlab,不加 sudo 打开的 matlab 窗口会卡住,这也是为什么上一步需要设置用户名为 root.
后来发现 貌似安装时不加 sudo, 就不会跳出让你输入用户名的界面, 默认为当前用户。 不过在运行时 仍需要输入 sudo matlab ,否则图形界面会卡住无法使用。
Ubuntu 22.04安装 Matlab R2022b
./install 即可
问题是无法保存设置 解决:
1 | mkdir ~/.cache/matlab-tmp |
在 matlab.desktop 中设置即可
1 | [Desktop Entry] |
解决双图标 matlab.desktop 中加上
1 | StartupWMClass=sun-awt-X11-XFramePeer |
pandoc 文件格式转换
1 | pandoc A.typeA -s -o B.typeB |
必要时加上
1 | --pdfengine=xelatex |
https://pandoc.org/getting-started.html
https://zhuanlan.zhihu.com/p/258912543
Ubuntu 20.04 wifi 经常断开链接
问题1.知道wifi密码,驱动也有,可以点击连接,总是提示”连接断开,您现在处于离线状态”。
1.打开终端“ctrl+alt+T”
2.输入: sudo vim /etc/modprobe.d/iwlwifi.conf
3.在文件末尾添加 options iwlwifi 11n_disable=1
4.保存,重启。
ubuntu默认无线连接模式为11n,如果路由未设置,则连接不上。
问题2.经常断网,重启就好
将/etc/ppp/options 文件中的 lcp-echo-failure 4 改为 lcp-echo-failure 40
或执行命令 sudo /etc/init.d/networking restart
ppp的很多选项都是默认的,其中lcp-echo-failure次数被设为4,而lcp-echo-interval设为30秒。也就是说,如果 120秒钟之内,ADSL服务器没有给回echo-reply信号,UBuntu便会认为网络已经出了问题,就会断开网络,搞得人非常不爽。症结找到了, 问题就要解决了,打开配置文件/etc/ppp/options,将lcp-echo-failure次数设为一个较大的数值就行了
https://www.cnblogs.com/fengxm/p/5981663.html
https://blog.csdn.net/qianqian_0825/article/details/81112488
http://bbs.chinaunix.net/thread-1553531-1-1.html
待办事项管理 go-for-it
http://manuel-kehl.de/projects/go-for-it/
图像处理 darktable
1 | sudo apt-get install darktable |
转换 ris 到 bibtex
安装
1 | sudo apt install cb2bib bibutils texlive |
配置环境变量
1 | vim ~/.bashrc |
使用
1 | ris2bib in.ris out.bib |
cb2bib 一共有四个工具
bib2pdf isi2bib med2bib ris2bib
可以做转换 有需要可以参考
bibutils 可以做更多转换
1 | bib2xml |
例如 bib 转换 ENDnote
1 | bib2xml input.bib | xml2end > output.enw |
bib 转换 ris
1 | bib2xml input.bib | xml2ris > output.ris |
这里还有一个 在线转换器 。。。
https://www.bruot.org/ris2bib/
Ubuntu20.04 texstudio 侧边符号栏 乱码
原因: qt5dxcb-plugin
解决:
1 | sudo apt remove qt5dxcb-plugin |
https://github.com/texstudio-org/texstudio/issues/709
https://tex.stackexchange.com/questions/506018/the-side-panel-shows-strange-characters-in-texstudio-2-12-16?r=SearchResults
Ubuntu 20.04 改变默认的screenshot位置
1 | gsettings set org.gnome.gnome-screenshot auto-save-directory "YOUR_SAVE_DIR" |
设置->键盘快捷键->截图
禁用所有截图键并添加自己的截图键命令
gnome-screenshot 对应截屏命令
gnome-screenshot -a 对应选择区域截屏
gnome-screenshot -w 截屏当前窗口命令
https://www.cnblogs.com/by-sknight/p/12321503.html
https://askubuntu.com/questions/961094/change-the-location-of-saved-screenshot-when-screenshot-taken-by-printscreen-but
Vimium : 一款好用的 chrome插件
F11 chrome 全屏浏览时, 无法查看书签栏, 工具栏, 以及输入网址.
于是查了半天,发现一款好用的插件可以解决,那就是 Vimium .甚至连鼠标都不需要了…
文档: https://github.com/philc/vimium
快捷键一览: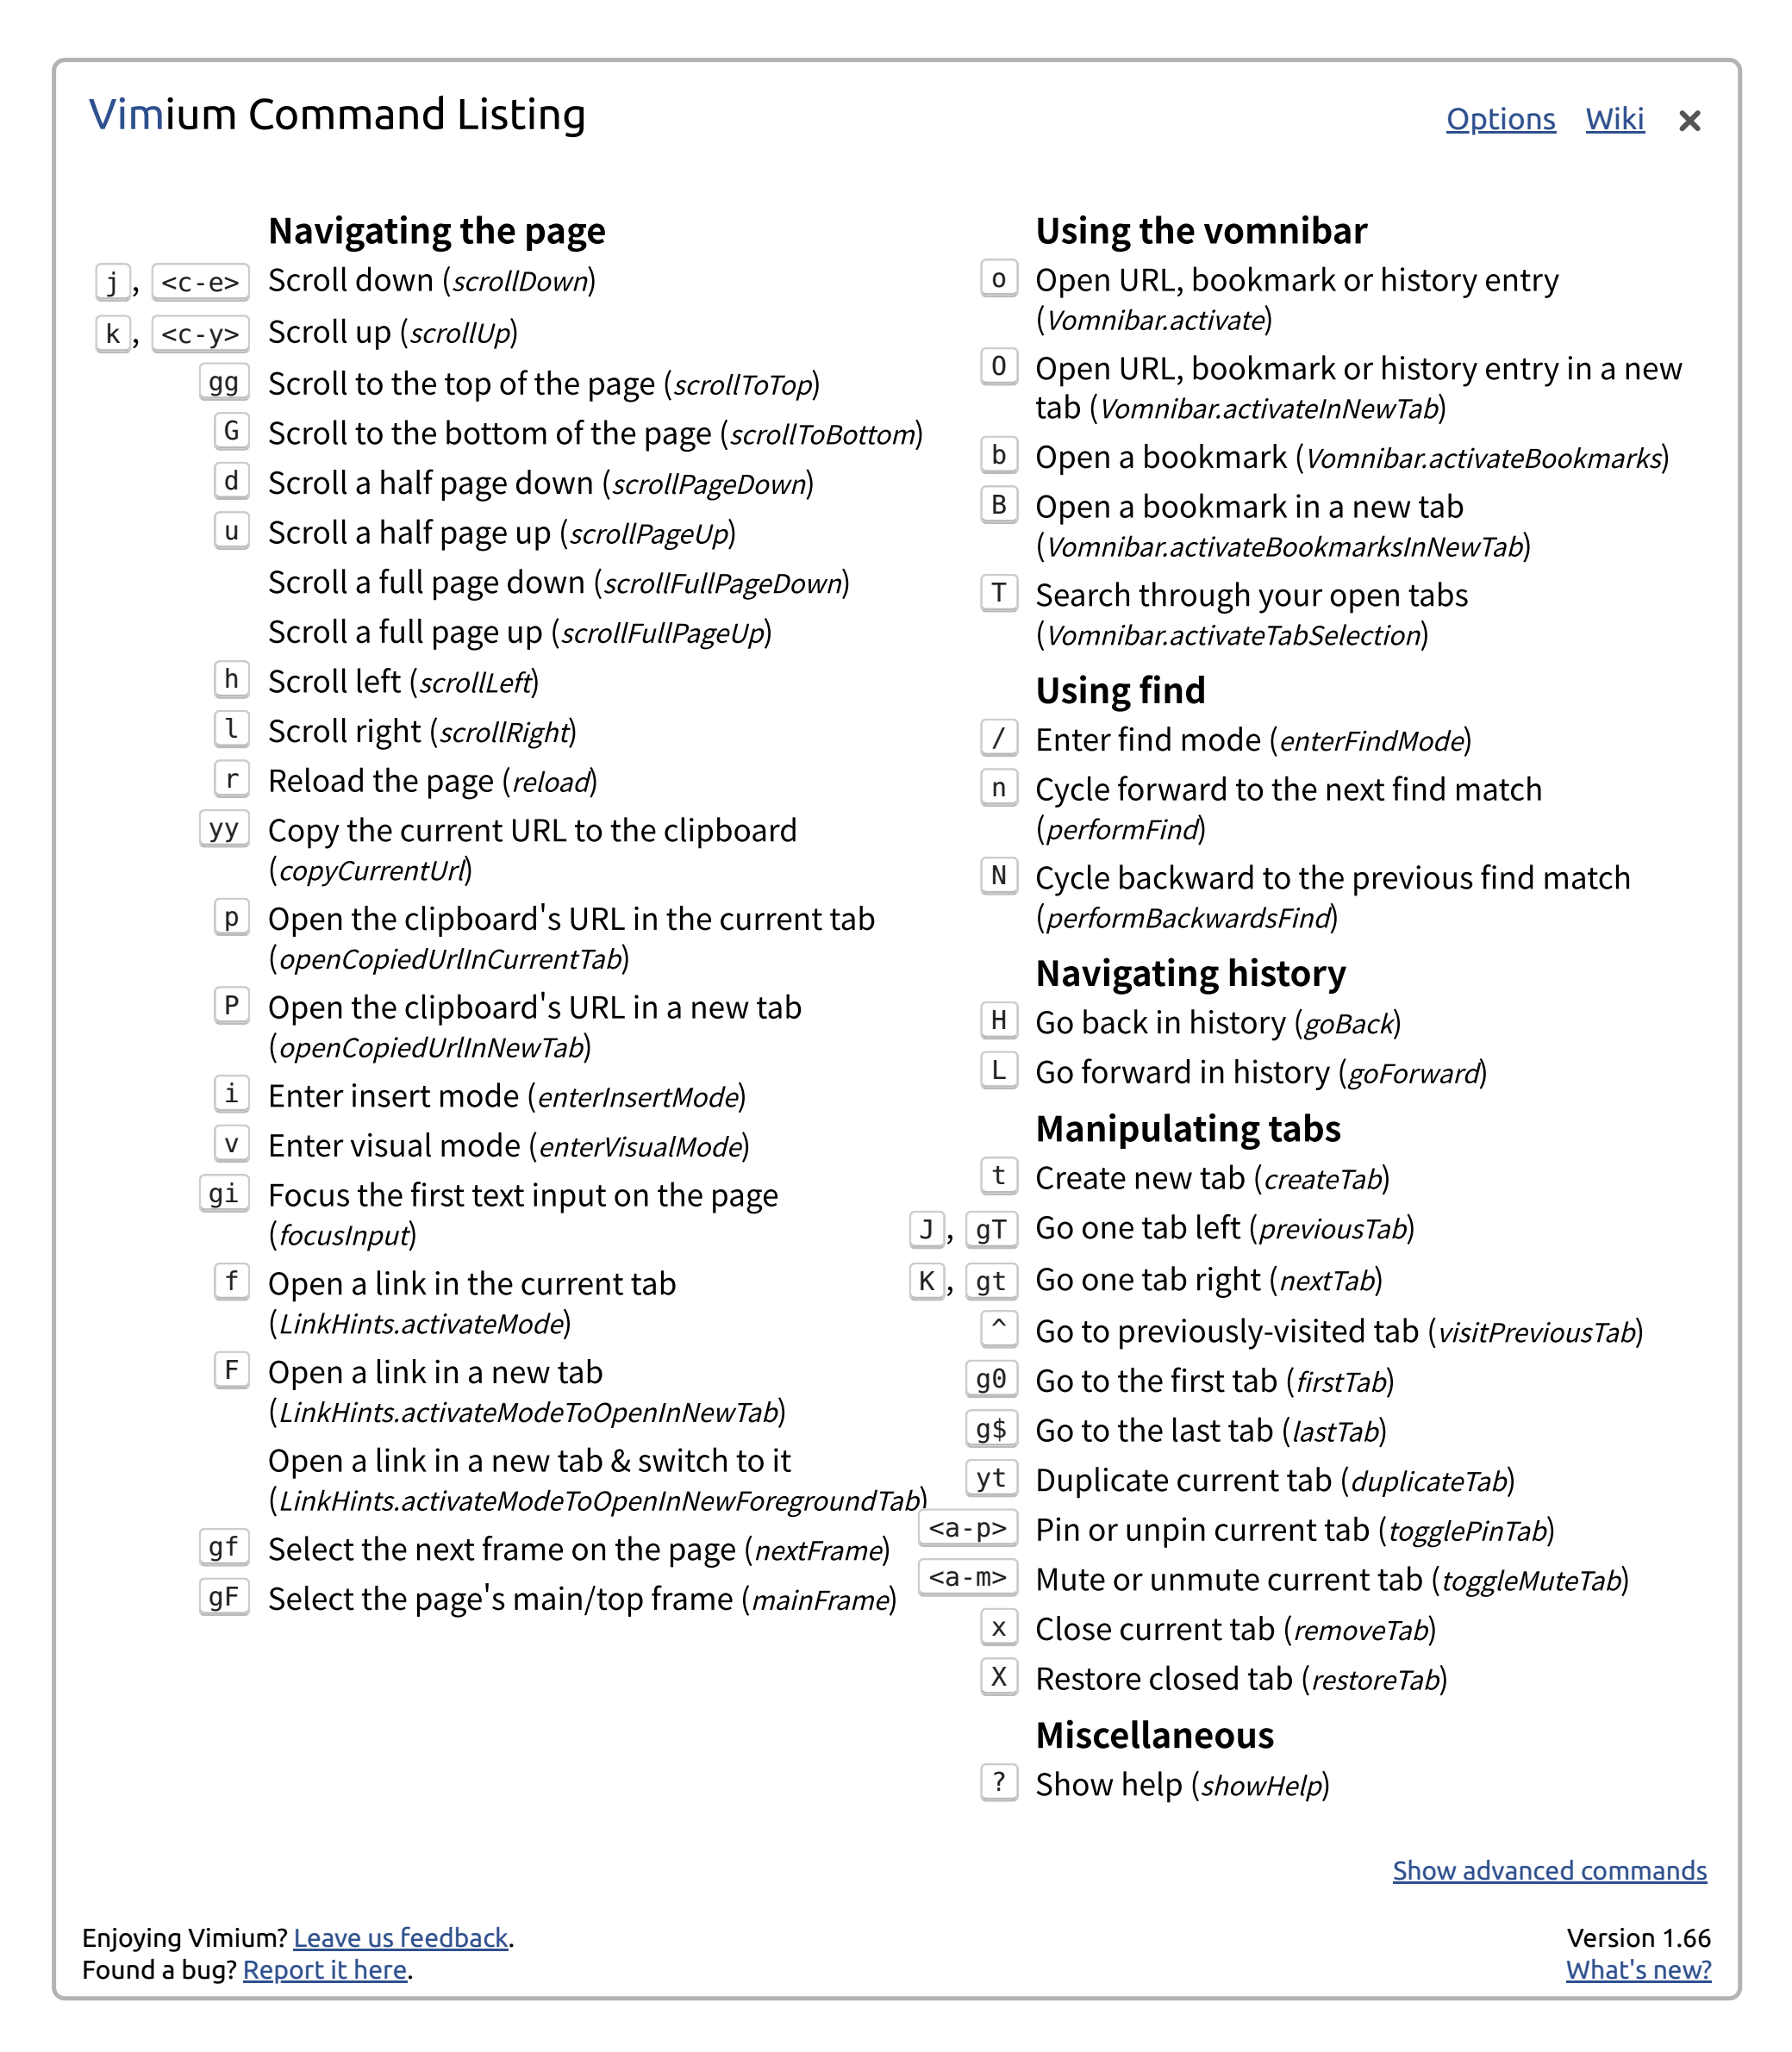
其中掌握了t, f, o, j,k,J,K,H,L,x 基本就不用鼠标了,于是我终于可以在全屏模式下,打开新的标签页,书签,以及其他的操作了.
甚至, 我还把 /user/share/applications里面的 chrome 启动文件进行了修改,在启动路径后面加入
—start-fullscreen , 使chrome 默认处于全屏状态.
源代码编译软件 MyPaint
所有需要的就是GitHub…
阅读安装说明。。。
https://github.com/mypaint/mypaint/blob/v2.0.1/BUILDING.md
你所需要的都在上面。。。
根据提示 先安装 libmypaint 以及 mypaint-brushes
libmypaint 安装到 YOUR_LIBMYPAINT_DIR
https://github.com/mypaint/libmypaint
安装依赖,需要的依赖项都会告诉你
1 | sudo apt install -y build-essential |
编译安装
1 | git clone https://github.com/mypaint/libmypaint.git |
mypaint-brushes 安装到 YOUR_MYPAINT_BRUSHES_DIR
https://github.com/mypaint/mypaint-brushes
这个连依赖都没有
1 | git clone https://github.com.cnpmjs.org/mypaint/mypaint-brushes.git |
安装依赖
1 | sudo apt-get install -y \ |
一开始我以为只安装python-3的依赖就行了,后来发现python2的依赖也需要
编译安装 安装到 YOUR_MYPRINT_DIR
1 | git clone https://github.com.cnpmjs.org/mypaint/mypaint.git |
配置环境变量和动态库的路径
我发现还是找到不到 libmypaint (在mypaint 编译和运行的过程中都需要这个库) 于是在.bashrc 中编辑
1 | #把libmypaint 的 lib 文件夹添加到 LD_ 变量中 |
最后在.bashrc中添加一下mypaint的环境变量
1 | export PATH=YOUR_MYPRINT_DIR/bin/:$PATH |
1 | source .bashrc |
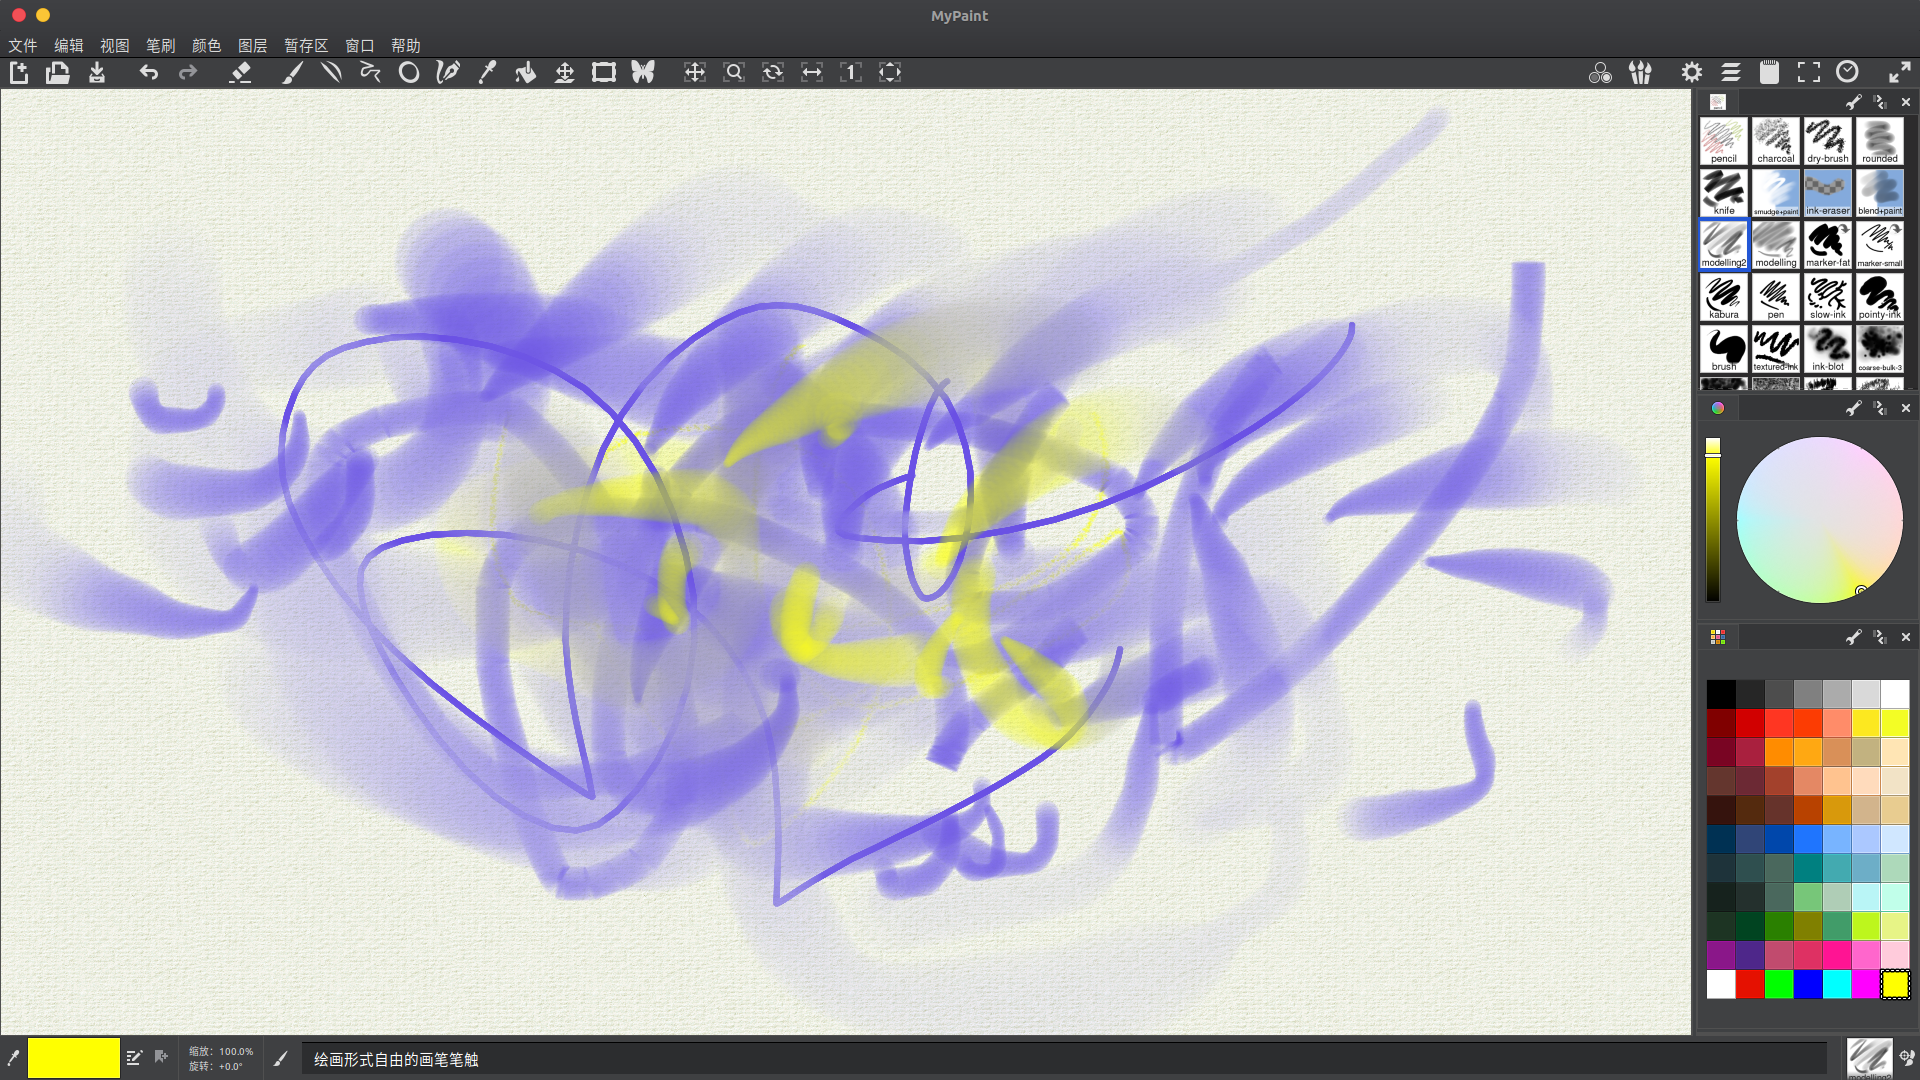
好了可以用了,主要是熟悉一下源码编译,其实就是按照github的readme文件,按照 安装依赖-> 配置路径 -> 编译安装 -> 设置环境变量以及动态库的变量 的顺序, 缺啥补啥就好。
Atom
安装
1.Texlive
终端输入
1 | sudo apt-get install texlive-full |
2.Atom插件
首先,打开atom设置的扩展界面,点击 编辑->Preferences->扩展搜索以下三个插件并安装:
language-latex
pdf-view
latex
配置使用
在latex插件的设置里 Opener选项,设置为 pdf-preview
按理来说,这时候应该就可以了,在Atom里的.tex文件编辑界面,按 control+alt+b就可运行并预览编译好的pdf,其他快捷键可以在latex插件的设置里找到。
但是我遇到了一些问题
可能遇到的问题
1.与虚拟键盘冲突
按 control+alt+b屏幕出现了虚拟键盘,弄了半天,发现键盘貌似不能关掉,否则搜狗输入法的选词板会显示不出来。
所以就把atom的快捷键改了:
在atom 编辑->Preferences->快捷键绑定界面点击 用户键盘映射打开 keymap.cson文件,输入:
1 | 'atom-text-editor[data-grammar~="latex"]': |
其中我把F5,F6,F7键设置了快捷键,可以自行更改。注意有缩进,去掉缩进会出错!最后保存并重启一下atom。现在,就可以用F5编译预览,F7清除编译文件,F6 sync不是很清楚是干吗用的。。。
2.中文包ctex编译错误
这个很简单,在插件latex的设置里,把 Engine选项选择 xelatex即可
现在,你应该可以使用atom来编译latex文件了!
一些优点
1.语法主题和UI主题可以比较随意的更换,看起来更加赏心悦目
2.文件目录结构比texstudio要清晰!
3 相比texstudio,atom更加简洁,pdf预览界面更大更好一些
4.点击右侧预览的pdf可以定位到左侧的latex代码中相应的位置! 超实用! texstudio
貌似没有这个 功能
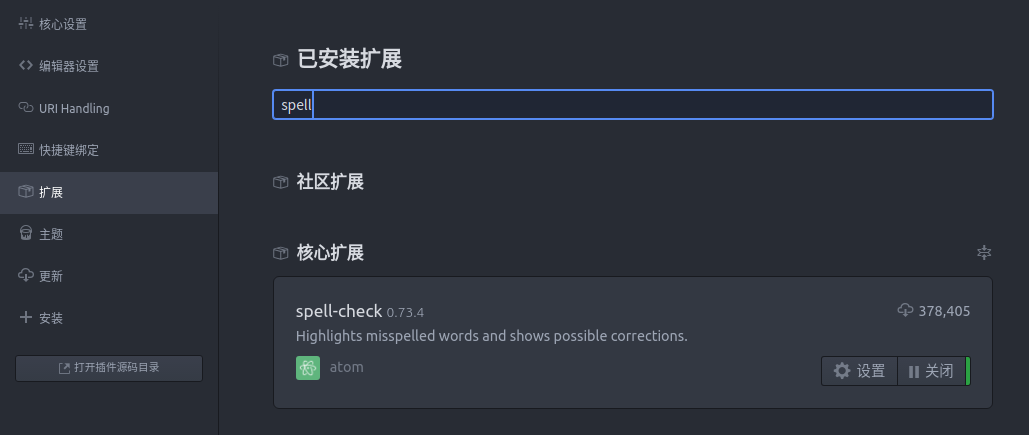
Atom 报错:Cannot load the system dictionary for zh-CN. Checked the following paths for dictionary files
每次打开Atom的时候会报错:
Cannot load the system dictionary for zh-CN. Checked the following paths for dictionary files
在编辑->Preferences>扩展中搜索spell-check 即可找到如下插件
这是一个核心插件,用于拼写检查
点击设置,将图中Use Locales 的勾去掉
在下面填入en-US
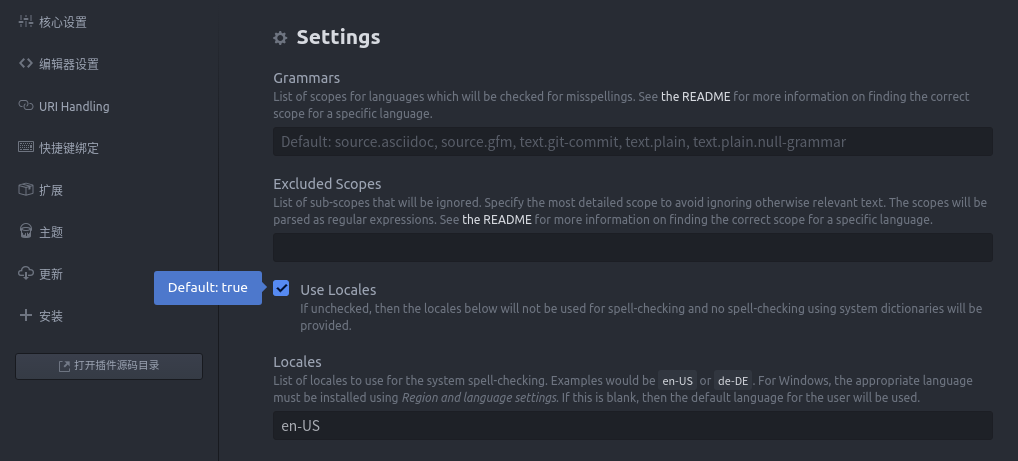
重启一下atom,发现已经没有错误了。
最后发现如果再将这个选项改回来,错误也没有再出现。
Ubuntu 20.04 Mathematica Mendeley 中文输入问题
step1.
你需要文件 libfcitxplatforminputcontextplugin.so
这个文件 ubuntu 18.04 是可以直接从系统里找到的,但是 ubuntu 20.04 系统里的这个文件不起作用, 所以只能用其他人重新编译的版本
下载Mendeley的那个, 改名为 libfcitxplatforminputcontextplugin.so, 虽然这个是为了解决 Mendeley 的中文输入问题,但是实际上Mathematica 也是可以用这个文件来解决中文输入的问题
step2.
复制到安装目录中
Mendeley
Mendeley 一般是安装在 /opt 目录下
1 | /opt/mendeleydesktop/plugins/qt/plugins/platforminputcontexts |
Mathematica
1 | ~你的安装路径/Mathematica/SystemFiles/Libraries/Linux-x86-64/Qt/plugins/platforminputcontexts |
重启再打开,就可以输入中文了